How To Backup iPhone To iTunes And Restore The iTunes Backup To iPhone – Step By Step Guide !! (Steps To Backup iPhone To Computer/Mac Device)
In the last post, we have seen a detailed post to take your iPhone backup to iCloud storage and also to restore the iPhone backup to your new device. Now its time to understand the next alternative method to backup the iPhone using the iTunes application. So just sit back and enjoy reading this post to know about the steps to backup your iPhone to computer/Mac device quickly.
Before proceeding further it is indeed important to know the difference between the two ways of taking your iPhone backup. Let’s have a quick glimpse of all the topics that we are going to cover now in this post :
- What exactly the difference between iCloud and iTunes mode of backup (iCloud Backup Vs iTunes Backup for iPhone) ?
- How To backup iPhone to iTunes (any computer/Mac device) ?
- How To Restore iPhone Backup From iTunes (computer)?
Without wasting any further time, let’s start exploring each of the listed topics above one by one. You may skip any section if you want to do so and directly jump to the practical steps to capture your backup (though having a background info nevertheless a wise decision)
What Is The Difference Between iCloud Backup And iTunes Backup ? (iTunes Vs iCloud Backup For iPhone!!)
We will see the exact pros and cons of each method here. So let’s start understanding the same starting with the iTunes backup option first .
With the iTunes backup option, you need to plug in a wire with your Mac or desktop PC and your iPhone. Whenever you use iTunes for backup , it is called as local backup . This means you would simply backup your iPhone data to your laptop local storage (or any external hard disk) with the use of a wired connector.
Possible Cons with iTunes backup: If there is any issue (stolen/lost/technical issue) with your computer then you may face risk of losing all your saved iPhone backup from your PC.
With iCloud we don’t need any cable or wire to backup your iPhone data. With a few clicks, you can able to backup your iPhone data to cloud storage . No wired connection required. This is an automatic backup option wherein no manual intervention required (unlike iTunes backup solution)
Possible Cons using iCloud Backup : The only cons here is that you need to buy a cloud storage plan once you completely exhaust your 5 GB free cloud storage space.You can anytime buy the premium plans with 50/200 GB storage options (so you need to spend some penny) .
The backing up process is slower in iCloud than the iTunes backup process (as backup is happening locally in your PC unlike in iCloud option where you are uploading data to the cloud server)
Recommended : Our personal recommendation is to use the iCloud backup option. If any case you don’t want to pay, then just go for the iTunes backup (manual) option . Moreover, you can further opt for both the options for ease of use and self-satisfaction.
How To Backup iPhone To iTunes ? (All The Steps You Need To Backup iPhone To Computer/Mac Device !!)
iTunes backup is basically a way to take your iPhone backup to your desktop computer/Mac device . For this backup method you need to connect your iPhone to the Mac/computer . So this iTunes backup for iPhone can be useful for any of the below-given situations :
1. You bought one new iPhone and want to transfer data from your local storage
2. You want to factory reset your iPhone (take backup and then restore it)
3. You want to simply clear the cache files to free up space in your iPhone
So whatever be the reasons, you need to follow the below-mentioned steps :
1. Launch iTunes software application in your desktop PC (any Windows/Linux/Mac device)
Note : Once you connect iPhone with your computer using a connector, you need to follow certain onscreen instructions like trust this computer, or password input on your iPhone etc , you need to give correct credentials. Then you can see your iPhone appears on your computer screen .Close the window and move ahead .
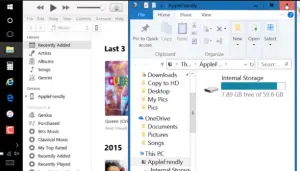
2. Connect your iPhone to the Mac (computer) using the lightning connector
3. Tap on the little iPhone icon in iTunes (iPhone icon will be present at the top left corner)

4. Then in the ‘Summary‘ section in the left ,
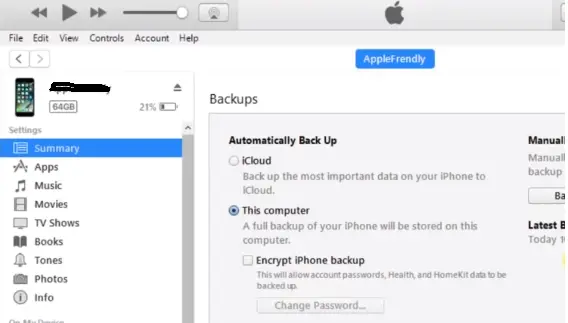
and you can see the ‘Backups‘ section in the iPhone details screen
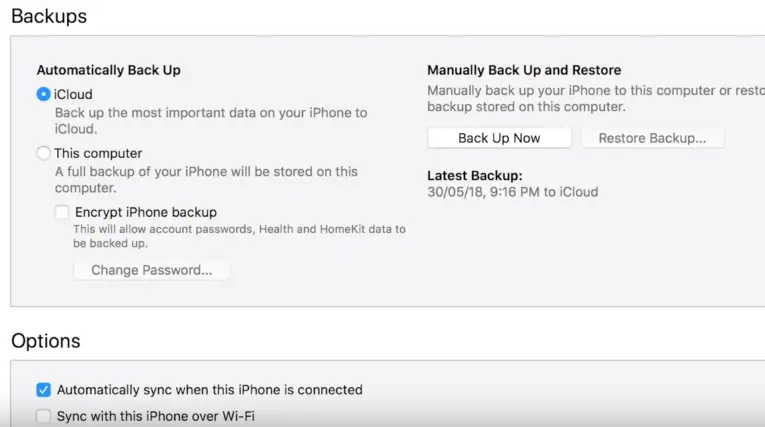
5. Now since we want to store the iPhone back up in the computer’s local storage we need to change the backup option to ‘This Computer‘ (all future backups will be stored to this computer and not the iCloud)
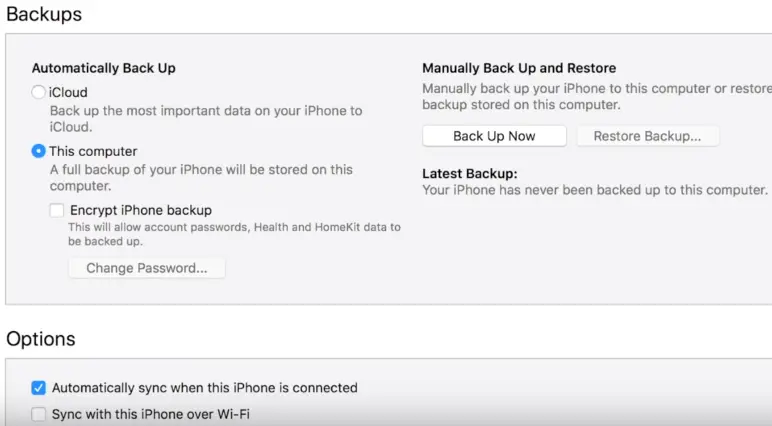
6. Now click on the ‘Back Up Now‘ option in the right to start the manual backup of your iPhone . (you can further see the recent backups available in this section)
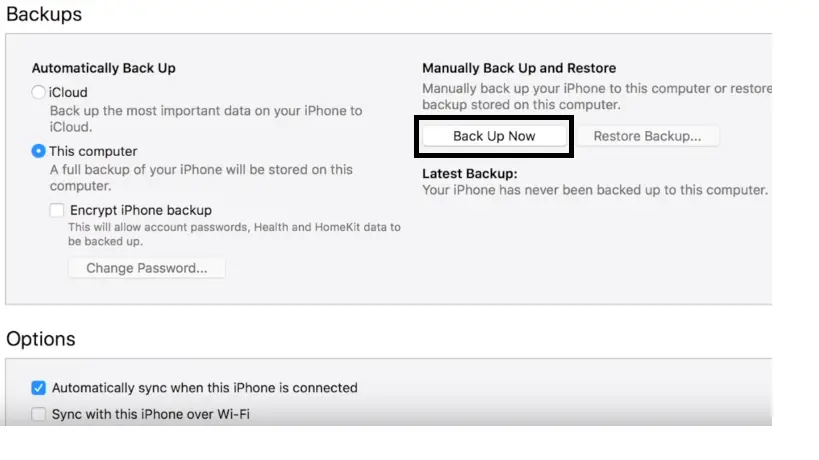
7. Now once Backup process starts ,you can view the progress at the top .

Also since we didn’t select the radio button for ‘Encrypt iPhone Backup‘ (explained later), so now we are doing an unencrypted backup of your iPhone.
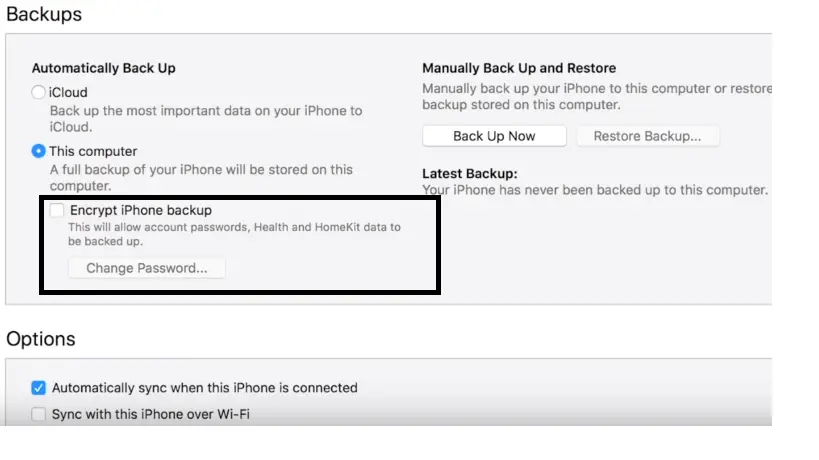
8. In this unencrypted backup process , everything will be backed up in your computer from the iPhone, but it will not backup the ‘Health and Activity Data‘ along with the Keychain data , other app data etc
9. If you want to backup your ‘Health and Activity Data’ into your computer then you need to encrypt your backup.
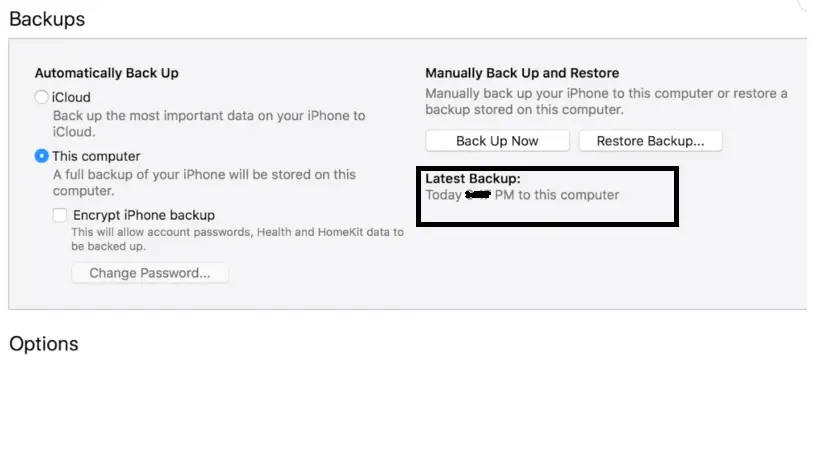
10. Once the backup process completes , you can see the latest backup date and time in the latest backup section .
 Note: To verify the backup , go to edit (at the top) –> Preferences –> Tap click on Devices at the top of the pop up screen –> Here you can see your latest backup with date and time associated with your device (you can also delete old backups from here)
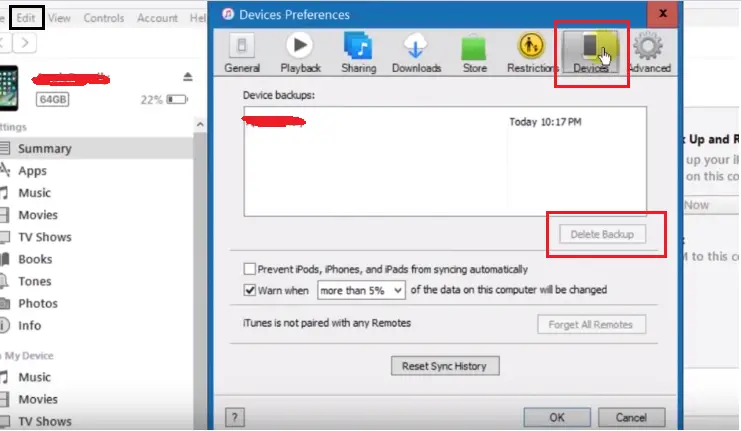
Now we should concern about the location of this backup data in our computer/Mac device (once backup is done) . Below we will give the path that you need to follow to find the backup data . We will start by Windows PC first and then will move towards the Mac device path .
1. Open any folder in your computer
2. Use the folder tree in the left to go to the ‘C Drive‘
3. On the right side , go and select ‘Users‘
4. Select the user name of your PC in the list of users
5. Click on ‘Appdata‘ and then select ‘Roaming‘
6. Click on ‘Apple Computer‘ and then select ‘MobileSync‘
7. Finally select the ‘Backup folder‘
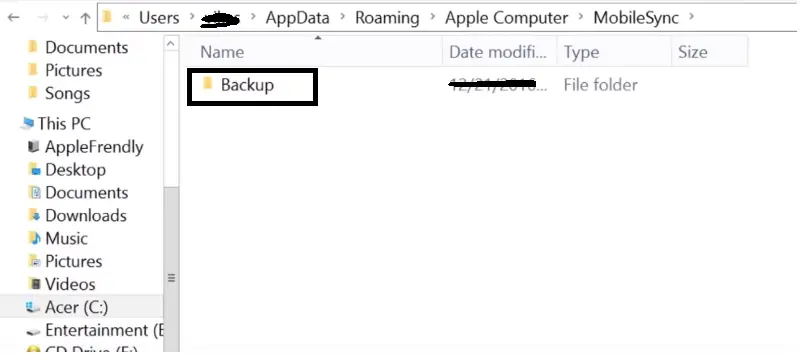
You can now copy and save the backup data to any of your external hard drives to use it later .
The above path is given for the Windows PC , if you are a Mac user , then you may find the below path useful in your Macbook device :
˜/Library/Application/Support/MobileSync/Backup
Just click on the menu bar and enter the above path to find all your backups saved in your Mac device .
Above we saw the steps for an Unencrypted iPhone backup (without your health and activity data) . Now we will see the steps for taking the encrypted data backup for your iPhone .
Note: In the encrypted data, you will additionally backup the Keychain data , health & activity data , app data , login credentials etc .
So once you restore using this encrypted data backup to your iPhone , no need to again login to any of the apps, as they will be already logged in with the save (backed up) credentials .
1. In the ‘Summary‘ section in the left , and then you can see the ‘Backups‘ section
2. Now since we want to store the iPhone back up in the computer’s local storage we need to change the backup option to ‘This Computer‘ (all future backups will be stored to this computer and not in the iCloud)
3. Now select the checkbox ‘Encrypt iPhone backup‘ , it will then ask you to create a new iPhone password (do remember this) . If you forget this, you can not able to restore this back up again .
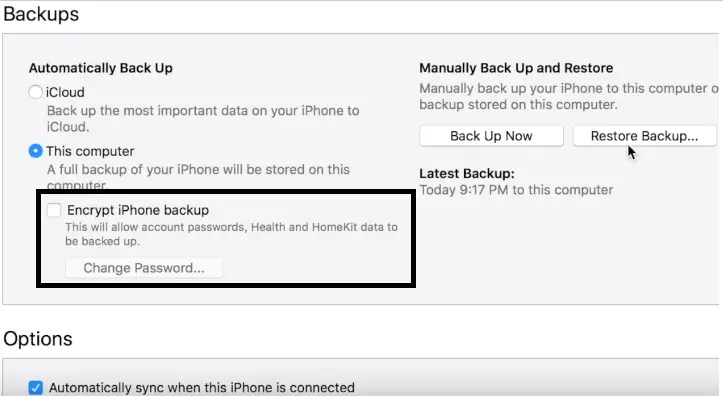
4. Once you click on the ‘Set password‘ option, your iTunes will start backing up the iPhone data. 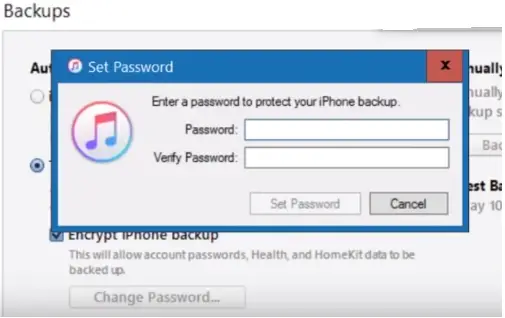
you can see the progress bar
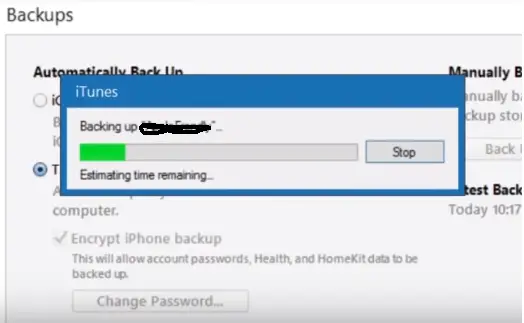
5. Again in the future if you want to take iTunes backup in your computer, you just need to select the option ‘Back Up Now‘ and the backup will automatically be encrypted (do note this password). Similarly, if you want to restore this backup, you again need the encryption password .
Note : To verify the backup , go to edit (at the top) –> Preferences –> Tap on Devices at the top of the pop up screen –> Here you can see your latest backup with date and time associated with your device (you can also delete old backups from here) , a small lock icon will appear adjacent to your backup (which means its encrypted)
How To Restore iPhone Backup From iTunes ? (All the steps to do so !!)
Now its time for us to make use of the iTunes backup we saved in the above section . Before we proceed for the steps , do make sure that you are connected to an active data connection and your iPhone is connected to the Mac/ computer device via the lightning connector.
Note : First you need to plug in the new/old device to your computer and then follow the below steps. Once you connect iPhone with your computer using a connector, you need to follow certain onscreen instructions like trust this computer, or password input on your iPhone etc , you need to give correct credentials.
Then you can see your iPhone appears in your computer screen .Close the window and move ahead.
To restore iTunes backup in your iPhone , follow the below steps :
1. Click on the little iPhone icon that appears at the top
Note : If it’s a new device, then you may have to follow few extra steps in your computer , then select the option ‘Restore from the Backup‘ in the last screen to start the restoration process
for an old iPhone , go with the below steps :
2. First, we need to turn off the setting ‘Find My iPhone‘ in your iCloud section of your iPhone , to access the said setting , just follow the below path as given in your iPhone:
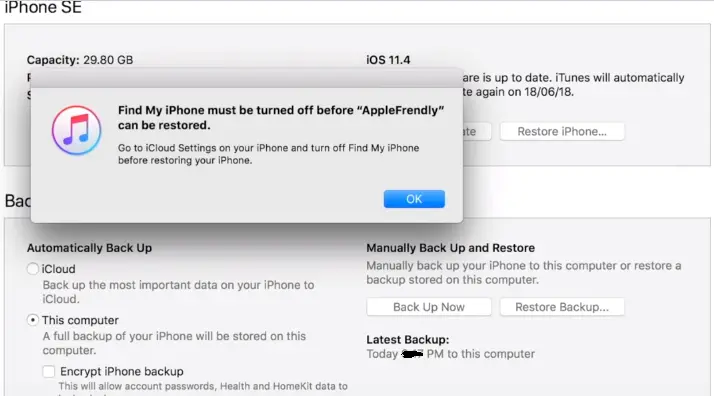
Tap on your name (in settings) –> tap on ‘iCloud’ –> scroll down and search for ‘Find My iPhone’ –> if it’s ON , then make this setting (toggle) ‘Off’ –> you now need to enter the Apple ID password –> Finally hit turn off
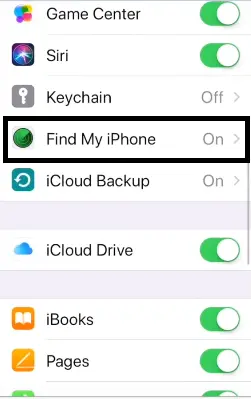
Make the toggle off as shown below :
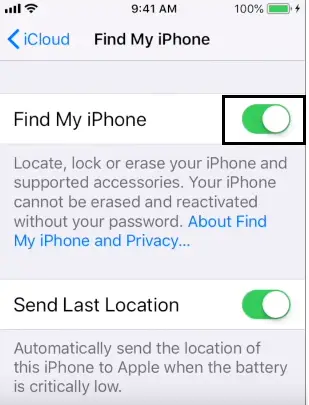
Enter your Apple ID password and tap on ‘Turn Off‘ :
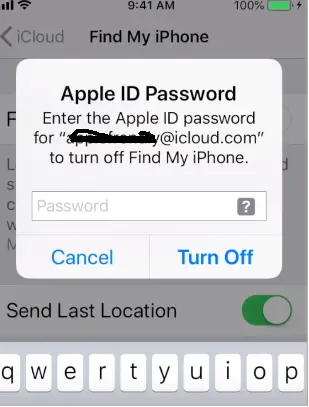
Note : If it already turned off then follow the next steps (just make sure it’s off)
3. Now go to your iTunes application on your computer.
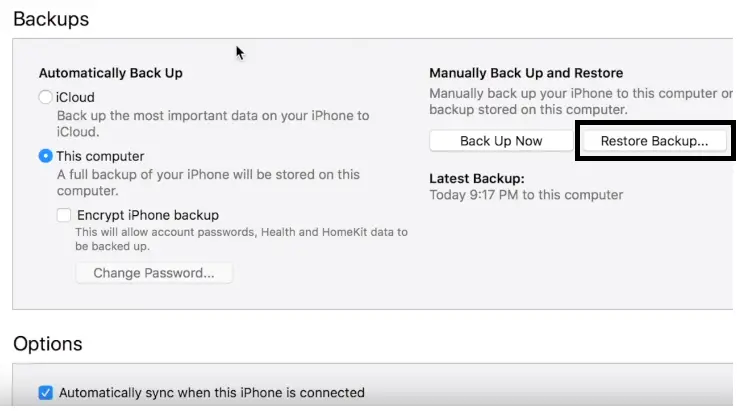
4. In the ‘Backups‘ section (in summary) , click on the option ‘Restore Backup‘ on the right side
5. Now it will display you a pop-up window to choose a backup file from the available backups (pro tip: choose the latest/recent one from the multiple backup files)
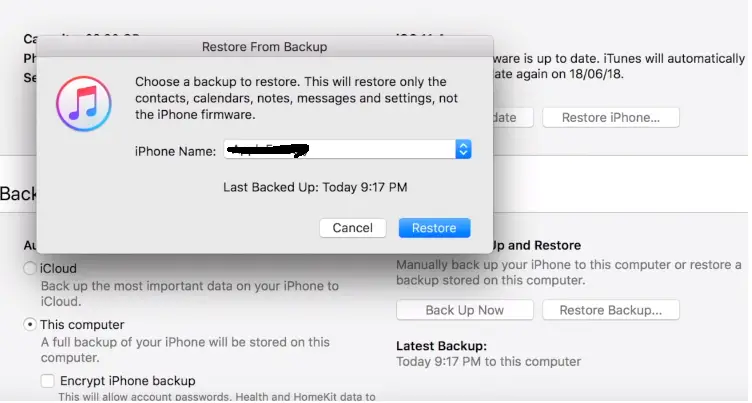
6. Click on ‘Restore‘ option (for the encrypted backup option , you have to password verify your restoration request)
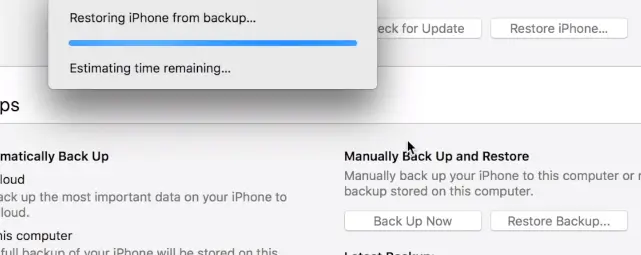
7. After this, your iTunes will start restoring your iPhone from the available iTunes backup.
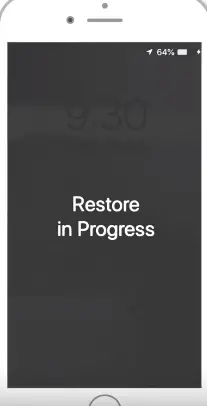
8. Simultaneously you can see a message ‘Restore in Progress‘ in your iPhone
9. Wait for some time, keep your iPhone connected to your Mac/computer device
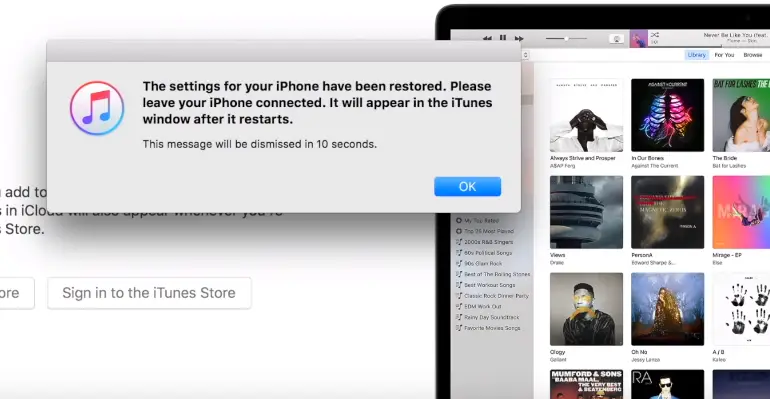
10. Your iPhone must boot itself by this time now , meanwhile, you may see one error in your iTunes i.e. ‘iTunes can not connect to this iPhone due to a passcode‘ , you can right away ignore this message error and wait for some more time.

11. Now you need to start following the instructions on your iPhone like select the wifi network , give Apple ID password etc (it will automatically update your iCloud settings) ,
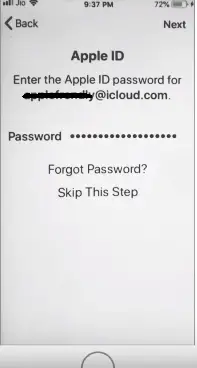
That’s all . Then you can see that some apps are still downloading from the Apple app store. The backed-up app data is already there but it takes some time downloading the apps .

Note : Once your complete data gets downloaded to your iPhone , no more error you can see in your iTunes . Everything comes to normal and it will again detect your iPhone as usual.
Now depending on the software running on your Mac or PC the next step will either involve the Finder on a Mac or iTunes on Windows (or on a Mac running an older version of macOS).
macOS Catalina
1. If you are running Catalina open a Finder window
2. You will see your iPhone or iPad on the left side of the finder window under locations
3. Click on it
macOS Mojave or older
If you are running Mojave or older on your Mac you will need to open iTunes.
There are multiple versions of iTunes you could be running and the method is different for each:
iTunes 12
Click on the iPhone’s icon in the upper-left corner of the iTunes window.
iTunes 11
Click on the iPhone tab on the right side of the window.
iTunes 10
The iPhone will be in the sidebar on the left
Once you locate your iPhone , you can then follow the above steps for iTunes backup and restoration .
iPhone Data Backup And Restoration Using iTunes (backup iPhone from Mac / computer PC ) Final Thoughts !!
As seen above it is indeed easy to use iTunes for iPhone backup and restoration if you really like the secure wired method of iPhone back up .
Also, it doesn’t cost you any single penny. But still, if you are a more tech savvy kind of person who likes everything to be in cloud (:-p) , then definitely you should go for the iCloud backup option .
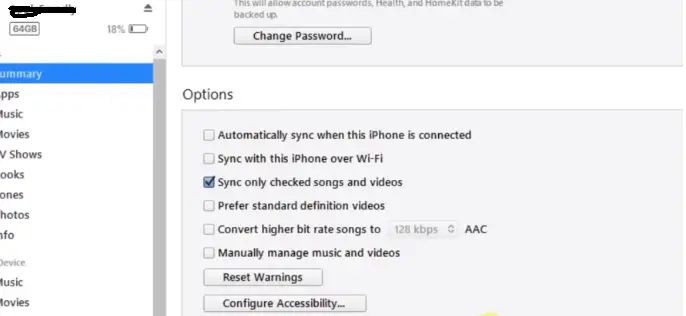
If you want you can further make use of the additional options list at the bottom of the iPhone details screen i.e. ‘Options‘ section .
You can select the first option (Automatically Sync When This iPhone is connected) to start the automatic sync of the iPhone data once you are connected to the iTunes application in your PC .
Hope you really liked this informative post related to the steps to take iPhone backup to iTunes and again restore iTunes backup to your iPhone .If you want to learn about the iCloud backup from iPhone , check this article . Stay tuned for more interesting stuff in this series.

Aric is a tech enthusiast , who love to write about the tech related products and ‘How To’ blogs . IT Engineer by profession , right now working in the Automation field in a Software product company . The other hobbies includes singing , trekking and writing blogs .

