How To Screen Record In Mac And iPhone Easily ? ( Free Screen Recorder In iPhone And Macbook With Audio !! )
In this fast-moving digital world, taking a screenshot or sharing a screen recording with your peers at your workplace or any other organization is indeed very useful . So for taking a screenshot in any device , there is a dedicated screenshot capture utility present (along with the different shortcuts present ) .
Now in this post, we will discuss the various ways of taking a screen record with Mac and iPhone devices with audio easily. So just sit back and enjoy reading this post for the list of free screen recorder options present for the Macbook and iPhone respectively.
Why Screen Recording Is Important ?
Screen recording will be very handy, whenever you want to share some video tutorial , to debug any issue or to help your colleague with any complex software installation. You can even share audio along with the shared video with your peer group .
So instead of using any dedicated messaging application like the renowned Skype , Hangout or the Facetime application etc , you may right away use the built-in screen recorders anytime to share your favorite video clip or small piece of any video tutorials with anyone else quickly without depending upon any video sharing tool anymore ( for its installation ) .
So without wasting any further time let us explore the steps to be followed for sharing your screen recordings seamlessly in Mac OS and in iOS platforms as given below .
How To Do screen Recording On Mac ? (Steps for Screen recording in Macbook !!)
Screen recording with Mac is very easy now with the introduction of the screen capture utility in the all-new macOS Mojave update in 2018 . Now you can easily capture live video using a keyboard shortcut quickly . With the all new screen capture module, you will also have the option to record live video on your Macbook screen .
To record screen with Any Mac device , just follow the below steps :
In order to launch the inherent screen capture utility introduced by the macOS Mojave in 2018 , follow the below steps :
1. Press Shift + Command + 5 (press ⇧⌘5) then you can see a small toolbar at the bottom. This is nothing but the snipping tool kit newly introduced in the macOS Mojave in 2018 .
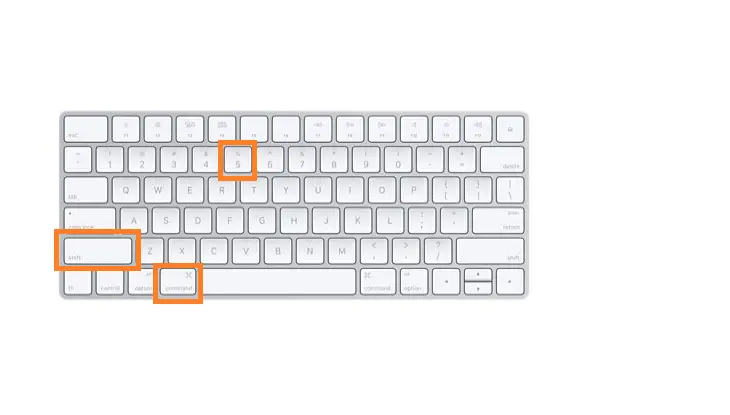
Now in this screen capture toolbar we have many options present let us first describe each of them :
- Capture entire screen
- Capture selected windows
- Capture selected portion
- Record entire screen and
- Record selected area
In this post , we are interested in the last two options i.e. the steps to record full screen or part of the screen in your Macbook efficiently.
Now in order to capture a recording in your Macbook using the snipping tool functionality , just follow the below steps :
1. Press Shift + Command + 5 , then in the screenshot toolbar at the bottom there are two options present i.e. to record full screen or to record a selected portion of the screen .
Your recording will begin immediately if you select Record Entire Screen (and click on Record option).
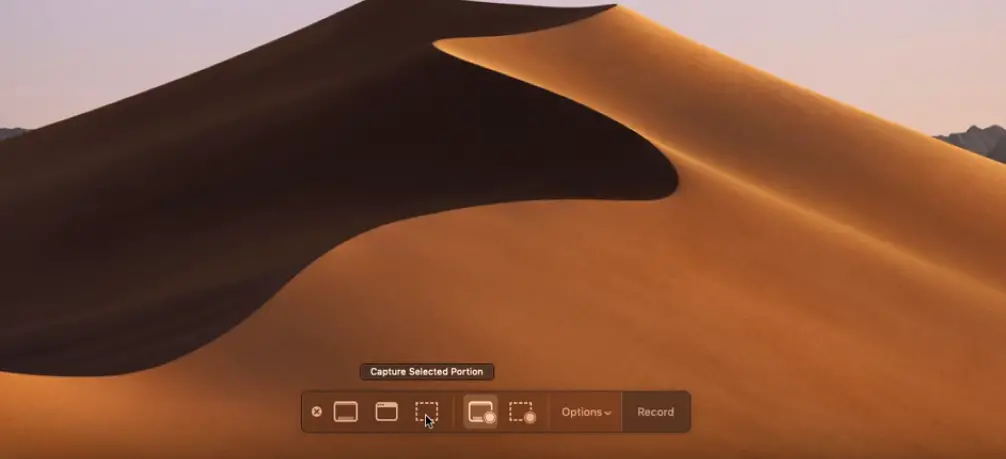
2. If you select the second option i.e. Record a selected portion of the screen , then you have to select the region by dragging the borders of the dotted lines that appear in the screen .
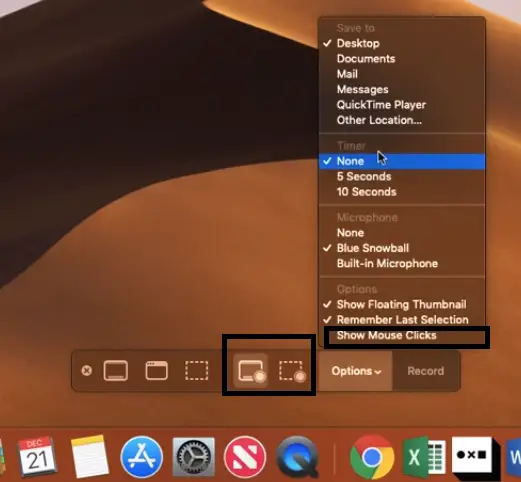
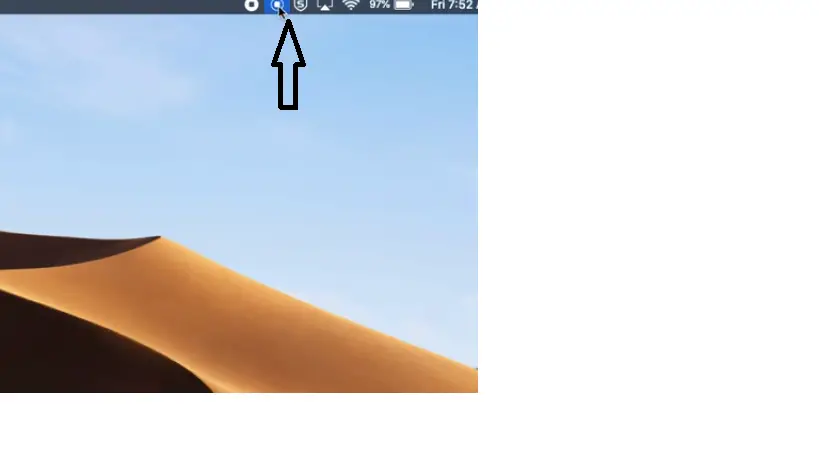
3. Click Record on the screenshot and recording control bar . Now once the recording will start , in order to stop the recording just click on the ‘Stop‘ button present at the top menu bar .
4. Once the recording is done, it will appear in the lower right corner of your screen, then right-click on it and select any option as required like delete , Markup, or select the save option (location) .
5. If you have more than one screen click and hold on the Record button and you will see option Screen 1 and Screen 2 . To stop the recording either click on the ‘Stop‘ option present at the top or press Shift+ Command + 5 again and press the stop button in the menu that appears.
Note : After capturing the screenshot/recording you can save it anywhere by clicking on the screenshot/recording . Additionally you can even predefine the save location by clicking on the ‘Options‘ menu in the screenshot toolbar at the bottom .
Then Choose the default save location as Desktop , Documents , Clipboard , Mail , Messages, or Preview under Save to set a save location .
5. You can easily edit the captured recording by right-clicking on the captured recording appearing in the lower right corner of the screen (or in the desktop) , then select the option ‘ MarkUp ‘
6. Click the trim button close to the top-right corner of the Quick Look window , then grab the hold points in order to manage the recording length and finally click on ‘Done‘ .
7. Finally you successfully captured a screen recording in your Mac device .
For integrating your audio properly in the Mac screen recording , you have to make sure that you enabled the microphone in your Mac device i.e. you can access this setting by clicking on Options > Built-In Microphone .
Once you recorded your video screen in Mac , you can now easily share it with your required peer members seamlessly with out any issues.
How To Do Screen Record With iPhone Quickly ? (Use the built in screen recorder in iPhone !!)
Now its time to dig deep into the steps of using the screen recording functionality in your iPhone . Taking a screen recording with the iPhone is indeed a very simple and useful feature .
Taking a screenshot is a lot easier task, as you have to press the two-button option to capture the screenshot . But for taking a screen recording , you may find the shortcuts a little hard to find . Fortunately , taking a screen recording in iPhone is also very simple .
Note : In order to access the Control Center , the method will be different, depending upon the iPhone model. Here we will be using an old iPhone model to demonstrate the screen record functionality in iPhone .
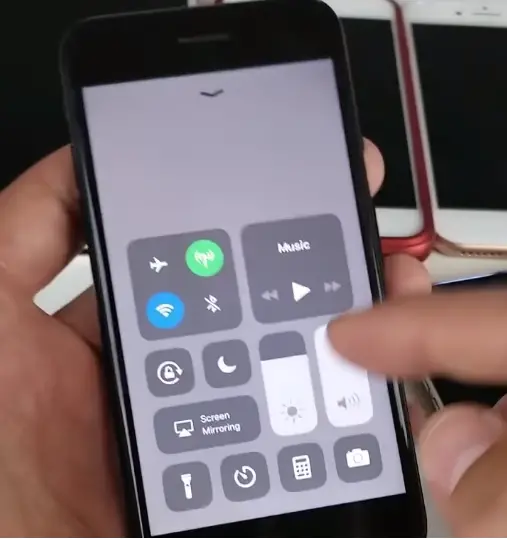
To capture the live screen video , just follow the steps as mentioned below :
1. Tap on the ‘Settings‘ icon . (gear icon)
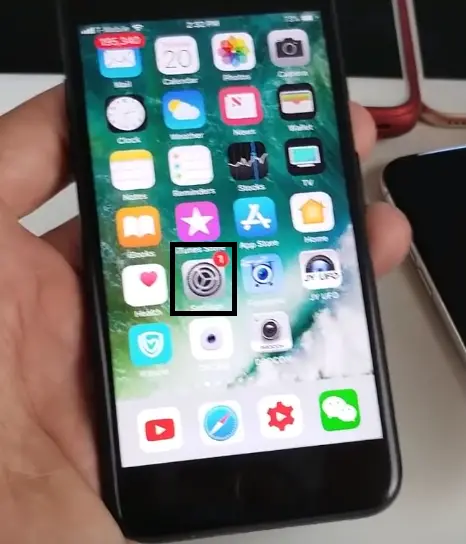
2. Then search for ‘Control Center’ in the list of options once you tap on the ‘Settings‘ icon .
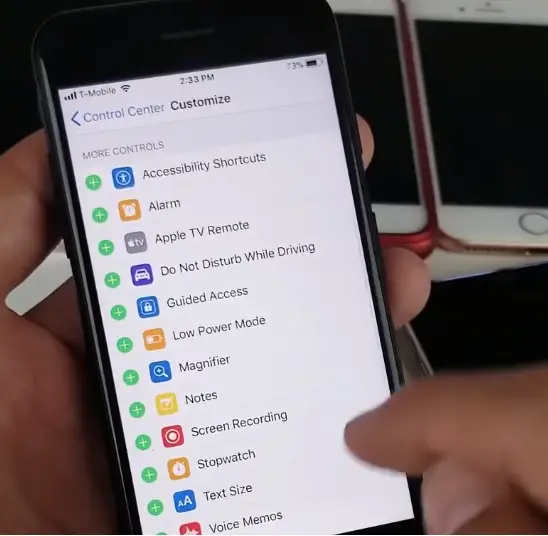
3. Then tap on ‘Customize Controls‘
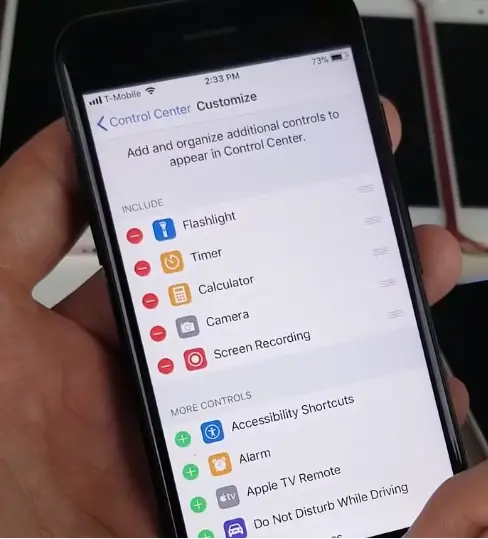
4. Search for the ‘Screen recording‘ option in the list , tap on it (on the ‘+’ menu icon)
5. After you tap on the ‘+‘ sign , it will then show the ‘Screen Recording’ option in the ‘Include’ section above.
6. Now access the ‘Control Center‘ in your iPhone by swiping from down or up (depending on your iPhone model)
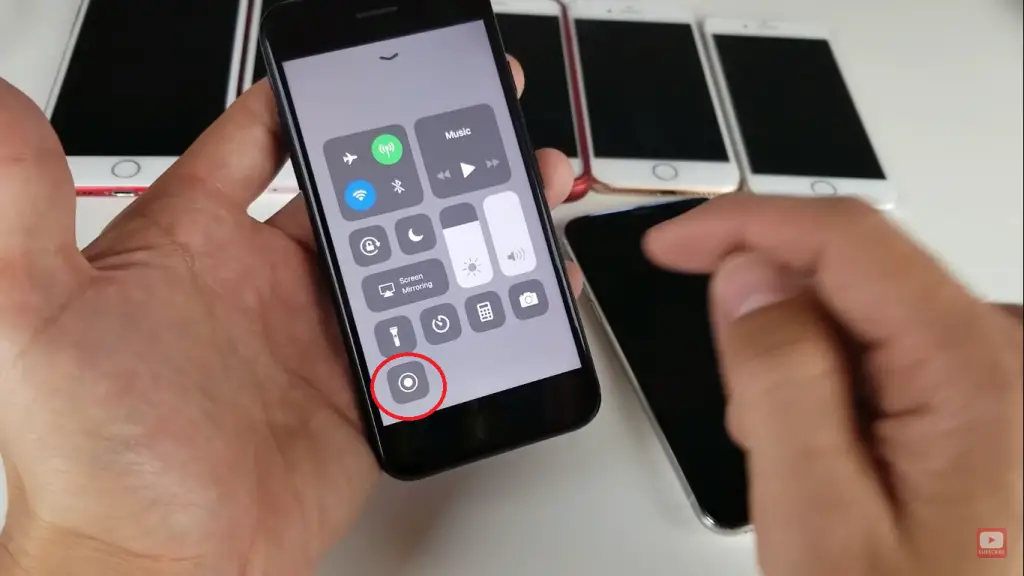
7. Then in the ‘Control Center‘ you can see the newly added menu icon of ‘Screen Recording’ added .
Note : By default, the microphone is disabled for this iPhone screen recording functionality. In order to start your microphone on , long press on the newly added ‘Screen Recording’ icon in the control center , then taps on the microphone option to enable it .
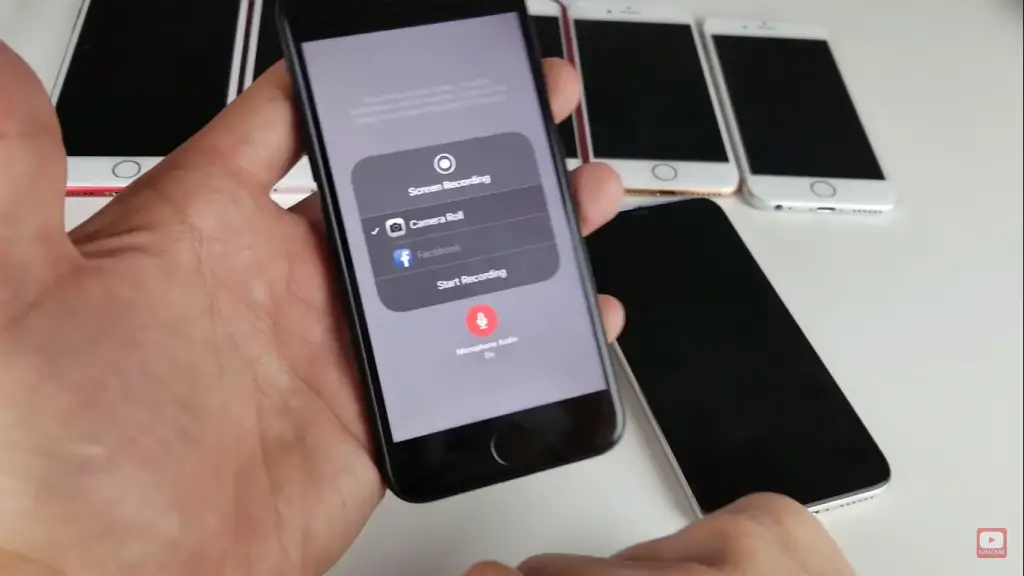
8. Then if you want to record the screen in your iPhone, just tap on this screen recording icon in the control center , then press the ‘Start Recording‘ option to start the screen recording .
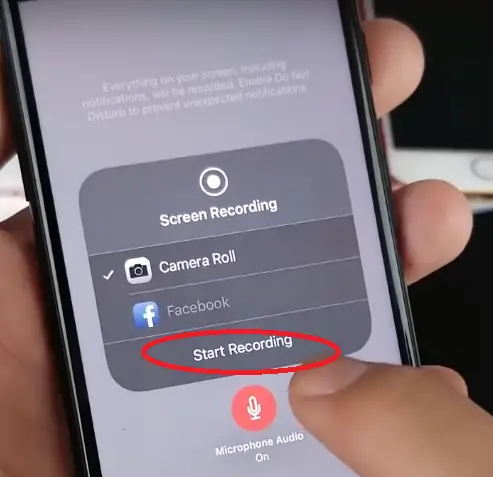
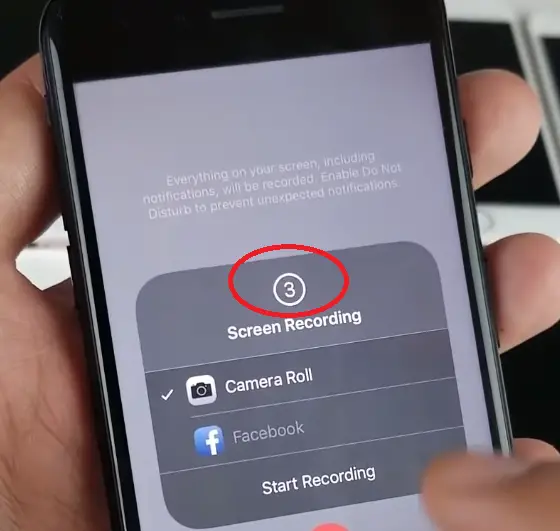
9. Once you tap on the ‘Start Recording‘ option , it will start a countdown timer of 3 sec . After 3 seconds , you can see a red-colored bar at the top of your iPhone .
10. You’ll know you are still recording because the time, shown in the upper right corner will be still red .
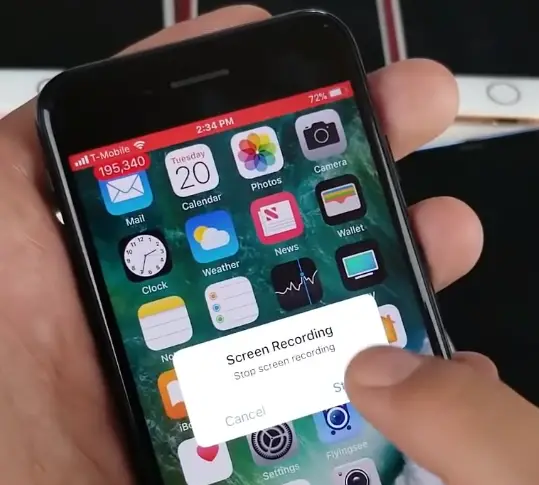
11. To stop iPhone screen recording , just tap on the red timer and then tap on ‘Stop’ option shown in the pop up window .
12. Then you will get the notification , that your iPhone screen recording gets saved at a desired location as set by you . Your new recording will appear in the Camera Roll. To see it , just open ‘Photos‘ app and check for the recording (newest item) .
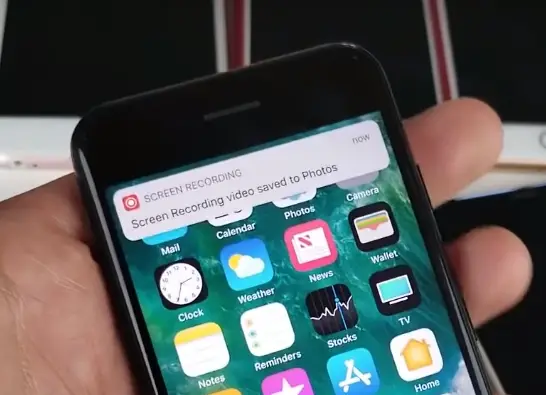
Finally, if you want , you can edit and save the video clip for further sharing as required .
Hope you really enjoyed this post and learned the steps for taking a screen recording in your favorite iPhone and Mac device, let me know in the comments section . Stay tuned for more interesting stuff in this series .

Aric is a tech enthusiast , who love to write about the tech related products and ‘How To’ blogs . IT Engineer by profession , right now working in the Automation field in a Software product company . The other hobbies includes singing , trekking and writing blogs .

