How To Transfer Data To Your New iPhone ? (Step By Step Guide To Transfer Data To iPhone From Android/Mac/iPhone & Vice Versa Using AirDrop, iTunes, iCloud etc !!)
Spoiler Alert – This post is long yet interesting !!
Buying a new iPhone is just like a dream for many of us to start communicating with others and a mere beginning in this digital world. Now you may think of a situation when you lost your old iPhone and then you bought a new iPhone. So whatever be the case, the first thing that comes to your mind is the way to restore all the old data of your iPhone to this new device.
In this post, we will look into every aspect of data sharing between your new iPhone and any of your Mac/Android (or any old iPhone) easily. So you need to follow some basic steps to perform this data transfer with your new iPhone.
Before digging deep into each of the method in this guide, let us first have a glimpse of all the topics that we gonna cover here with detailed steps for your reference :
- How to set up your new iPhone device quickly ?
- How to transfer data to new/alternate iPhone from some other iPhone device (using iCloud/iTunes Backup Option) ?
- How to transfer data from any Android device to iPhone (and also from iPhone to Android) ?
- How to transfer data from iPhone to iPhone without iCloud/iTunes (using a new data migration feature) ?
- How to file transfer between Mac and iPhone device (and vice versa using AirDrop /Wired Connection) ?
We will now cover each of the listed topics one by one. All the below steps are useful if you want to transfer any data between the mentioned device types . (you may skip any section from the above list to save time if you want)
If you just want to take a backup and restore your iPhone data, then we’ve got you covered. You may check the below-detailed post for taking/restoring the iPhone backup.
How to backup iPhone to iCloud (And restore backup to iPhone) ?
How to backup iPhone to iTunes (And restore backup to iPhone) ?
Now to understand the process of transferring your data to any iPhone , just sit back and proceed further.
How To Set Up Your New iPhone Quickly ?
Before you start using your new iPhone (and transfer data) , you need to first set up your iOS device. So let’s start the setting up process right away :
Note : Two prerequisites here, connect to an active internet connection (wifi) and connect your iPhones (old and new) to wifi. Also, turn the Bluetooth option ON in your old iPhone (to use the quick start guide).
1. Turn On your new iPhone device and swipe up to see the settings screen
2. Select the language you want to set
3. Select the country
4. Now in the ‘Quick Start Guide‘ screen, tap on the ‘Set Up Manually‘ option at the bottom
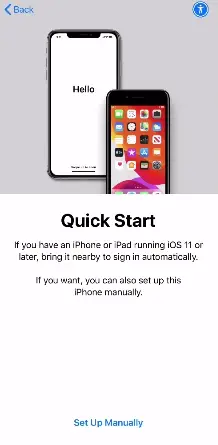
Note: If you have an iPhone/iPad with iOS 11 running (or higher version) , then bring it nearby to sign it automatically. The QuickStart screen appears on your current (old) device and offers the option of using your Apple ID to set up your new device. Do make sure that the Bluetooth option is turned on in your old device.
Then put the camera of your old iPhone right above the new iPhone (to scan the animation as prompted). Wait for a message that says Finish on New Device.
If you can’t use your current device’s camera, tap Authenticate Manually, then follow the steps that appear.
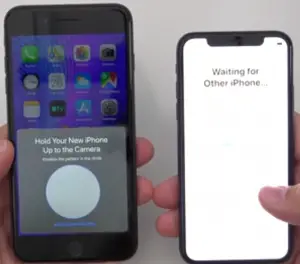
If you use the above feature then some of the steps will be skipped from the below steps , as all details already got synced with your new iPhone .
5. Set up Face ID and set passcode
6. Enter the Apple ID and password , tap on ‘Next‘
7. Go through the ‘Terms and Conditions‘ page and finally tap on ‘Agree‘
8. Then you have to tap ‘Continue‘ for the next few screens (location services , screen Time , set up Siri etc)
9. Then finally you can view the screen ‘App and Data‘ with four options as shown below
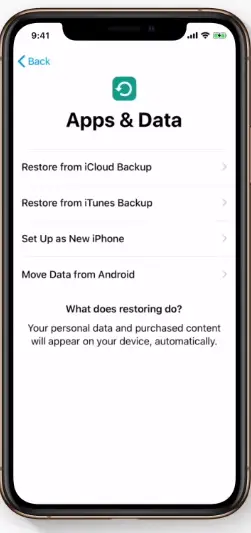
You need to restore the backup data (from iCloud/iTunes or from any Android device) or you can even set this as a new device . Now for the next set of steps, you have to jump over to the next section.
How To Transfer Data To Your New/Alternate iPhone From Some Other iPhone Device ?
Now to transfer data from old iPhone to the new iPhone (or any alternate iPhone provided you factory reset that device) , you can use either of the two ways listed below.
We have the well known old conventional process of taking iPhone backup using iCloud and iTunes option . So here we gonna see both the ways one by one .
How To Transfer Data To Your New iPhone From Any Old/Alternate iPhone Device Using iCloud Backup ?
First, let’s start with the iCloud backup option. Here we will now see the steps to take iPhone backup from any old iPhone and then restore the backup in the new iPhone from iCloud. So let’s start with the iCloud backup process :
1. Tap on the ‘Settings‘ app (gear icon) in your iPhone
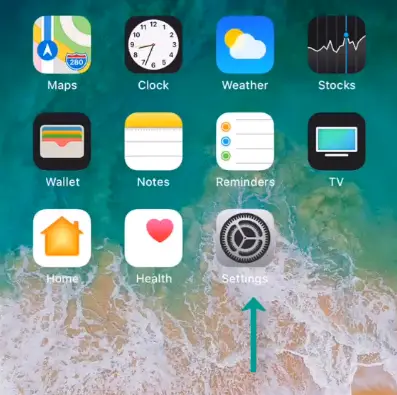
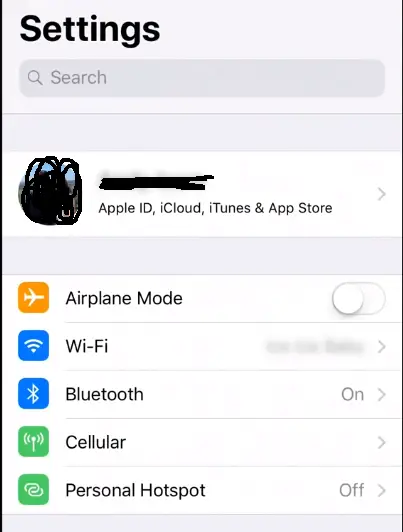
2. Tap on your name (Apple ID) at the very top option
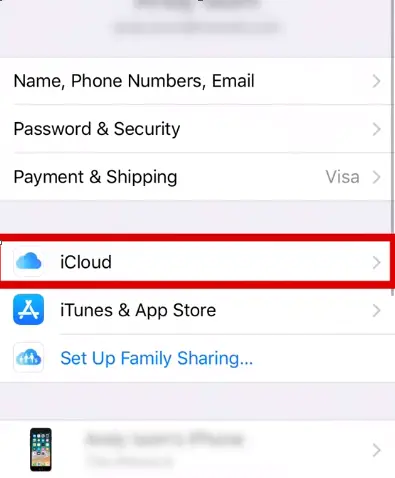
3. Select iCloud and tap on it
4. Now in this screen, you will see various color notations to display your iCloud storage (Manage storage section)
scroll down and tap on the option ‘iCloud Backup‘
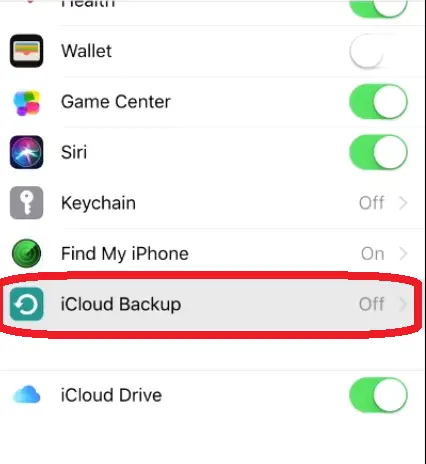
5. In the next screen, you can see a toggle option for turning On and Off your iCloud backup feature.
6. Toggle the option to the right to turn the iCloud backup option ‘ON‘ , (the option turns green)
7. Tap ‘Ok‘ in the ‘Start iCloud Backup‘ pop us dialogue box , after this, you will see a blue-colored text ‘Back Up Now‘
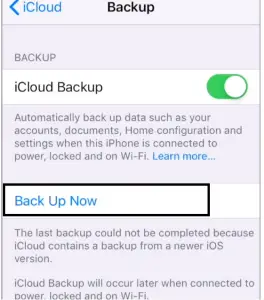
8. Hit the option ‘Back Up Now‘ to manually start the iCloud backup option. Then the process will start and it takes time depending upon your iPhone data and file size. (you can further see the estimated time left)
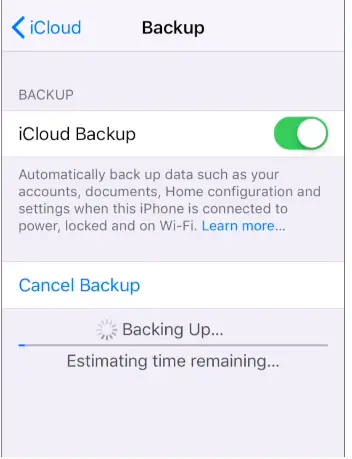
Finally, we are done. Now you can use this recently captured backup whenever you want to. Now we shall proceed to our next section i.e. Restore this iCloud backup with steps as given below :
Note: You remember we left abruptly at step 9 (set up new iPhone section) , now you can resume the steps from here. Go through the normal steps of installation and reach till the ‘Apps & Data‘ screen
1. To set up your Apps and Data (Apps and data screen) , there will be various options present, but we need to select the option ‘Restore From iCloud Backup‘
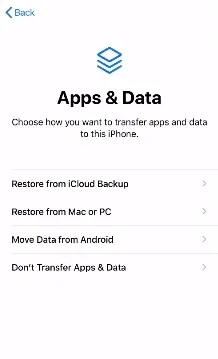
Note : In the above screen you have to choose how you want to transfer your old Apple device data (provided you have any)
4. Enter your Apple ID (the one you have already used earlier) , then hit next
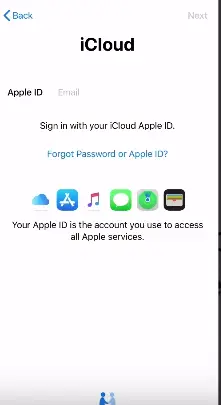
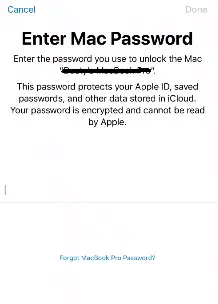
Note : Once you enter the email address and password, it will then verify your identity by sending a code to some other Apple device like a Macbook , Apple watch or old iPhone etc . Once you logged in with your Apple ID, then it may ask you the password of your other Apple device .
5. Now you can see a screen showing all the recent backups available to be restored in this iPhone (mapped to your Apple ID) , you can further view all the list of backups along with the device and the OS version alongside.
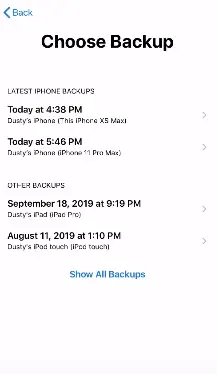
6. Select the most recent version of backup and tap on it (then hit continue for the next few screens)
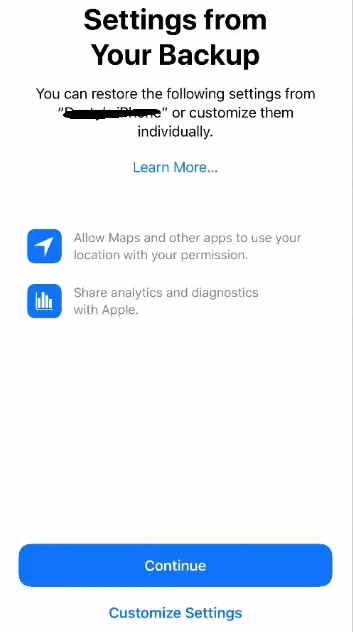
7. Finally, the restoration process will start (it may take a few minutes) , then again it will reboot your iPhone
8. Input your passcode , it will take some time to download the apps from app store (app data is already there in the iCloud storage space)
Once everything is done, you can finally able to turn on your iPhone device and then see the app icons downloading in the app tray of your iPhone. The app data is already present in the iCloud storage , only the apps are installing from the Apple app store .
How To Transfer Data To Your New iPhone From Any Old/Alternate iPhone Device Using iTunes ?
Now we gonna see the iTunes backup process. So just follow the below steps carefully to take the iPhone backup to iTunes :
1. Launch iTunes software application in your desktop PC (any Windows/Linux/Mac device)
Note : Once you connect iPhone with your computer using a connector, you need to follow certain onscreen instructions like trust this computer , or password input on your iPhone etc , you need to give correct credentials.
Then you can see your iPhone appears on your computer screen . Close the window and move ahead.
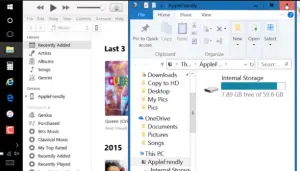
2. Connect your iPhone to the Mac (computer) using the lightning connector
3. Tap on the little iPhone icon in iTunes (iPhone icon will be present at the top left corner)

4. Then in the ‘Summary‘ section in the left ,
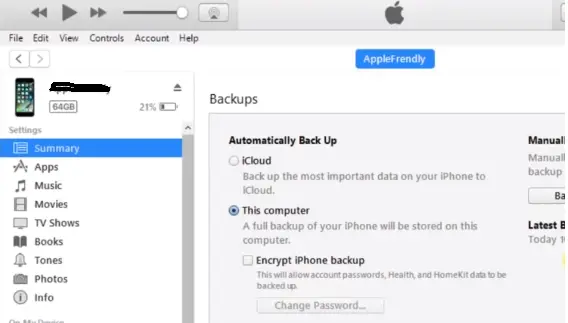
and you can see the ‘Backups‘ section in the iPhone details screen on the right
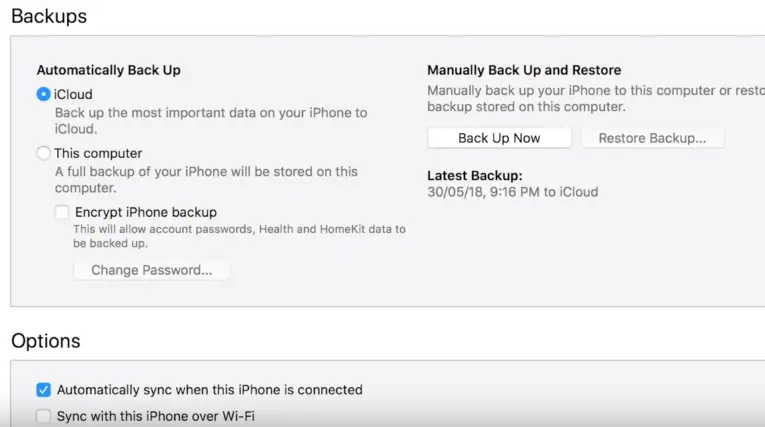
5. Now since we want to store the iPhone back up in the computer’s local storage we need to change the backup option to ‘This Computer‘ (all future backups will be stored to this computer and not the iCloud)
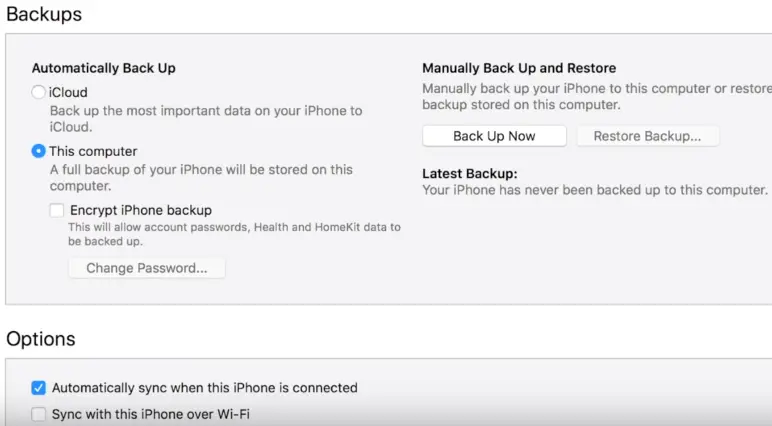
6. Now click on the ‘Back Up Now‘ option in the right to start the manual backup of your iPhone . (you can further see the recent backups available in this section)
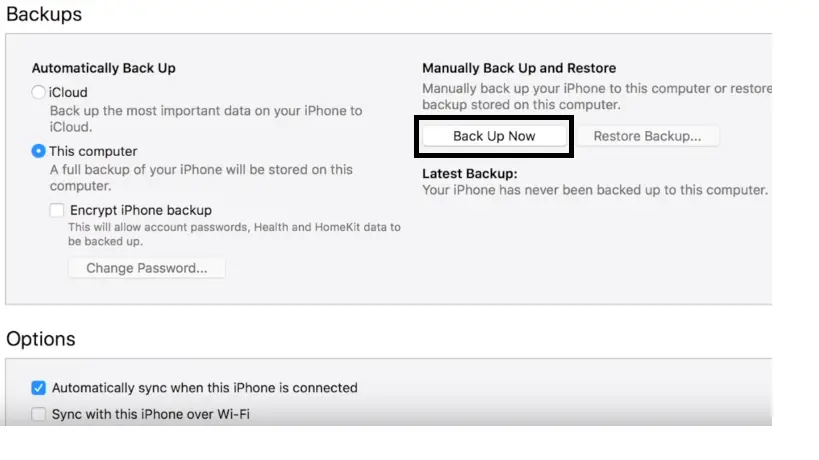
7. Now once Backup process starts ,you can view the progress at the top .

Also since we didn’t select the radio button for ‘Encrypt iPhone Backup‘ (explained later), so now we are doing an unencrypted backup of your iPhone.
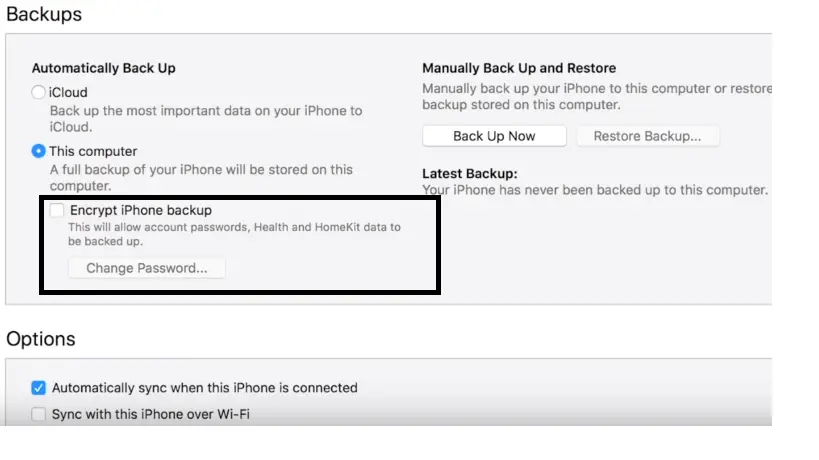
8. In this unencrypted backup process, everything will be backed up in your computer from the iPhone, but it will not back up the ‘Health and Activity Data‘ along with the Keychain data, other app data , login credentials etc
9. If you want to backup your ‘Health and Activity Data’ into your computer then you need to encrypt your backup.
10. Once the backup process completes , you can see the latest backup date and time in the latest backup section.
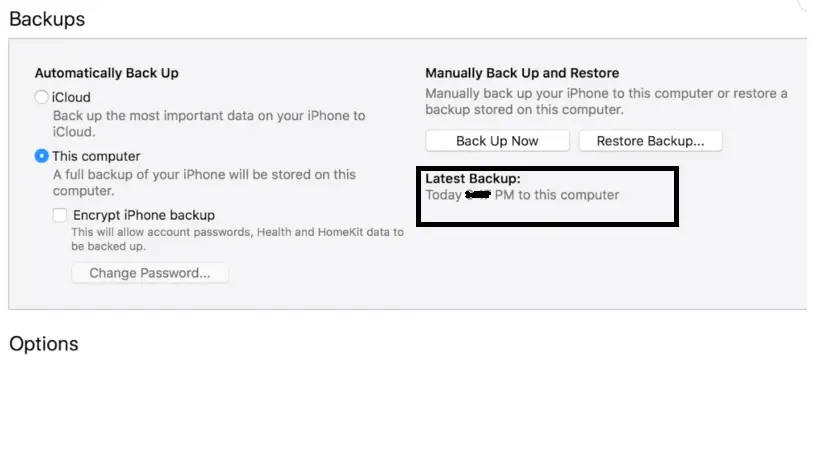
In the encrypted data backup, you will additionally backup the Keychain data, health & activity data , app data, login credentials etc .
So once you restore using this encrypted data backup to your iPhone, no need to again login to any of the apps , as they will be already logged in with the save (backed up) credentials.
So if you want to opt for the encrypted mode of backup then just select on the checkbox for the option ‘Encrypted iPhone Backup’ as shown below
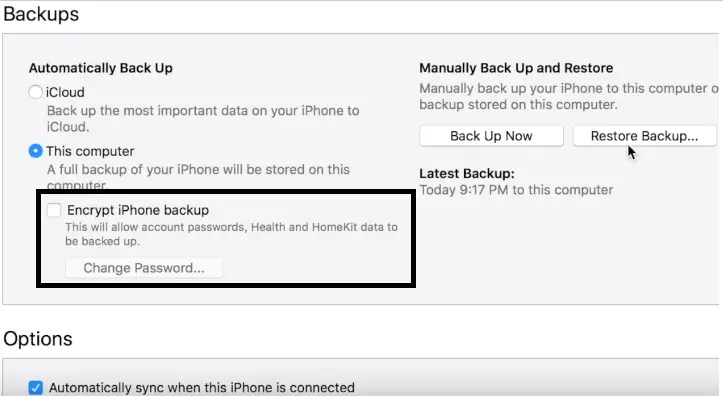
Once you click on the ‘Set password‘ option , your iTunes will start backing up the iPhone data . 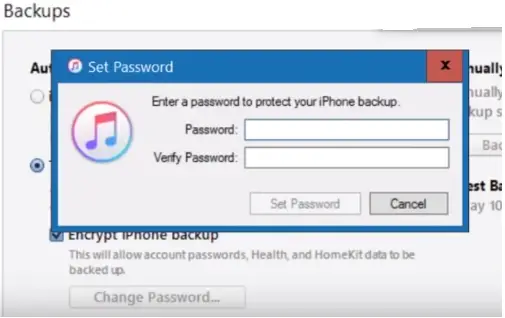
Again in the future if you want to take iTunes backup in your computer , you just need to select the option ‘Back Up Now‘ and the backup will automatically be encrypted (do note this password). Similarly, if you want to restore this backup , you again need the encryption password.
The process to restore this iTunes backup to your new iPhone :
Note: You may remember that we left abruptly at step 9 (in set up new iPhone section) , now you can now resume the steps from here . Make your new iPhone connected to your desktop PC with the connector all the time during this process. Go through the normal steps of installation and reach till the ‘Apps & Data’ screen
1. To set up your Apps and Data (Apps and data screen) , there will be various options present , but we need to select the option ‘Restore From iTunes Backup‘

2. Now go to your iTunes application on your computer .
3. In the ‘Backups‘ section (in summary) , click on the option ‘Restore Backup‘ on the right side
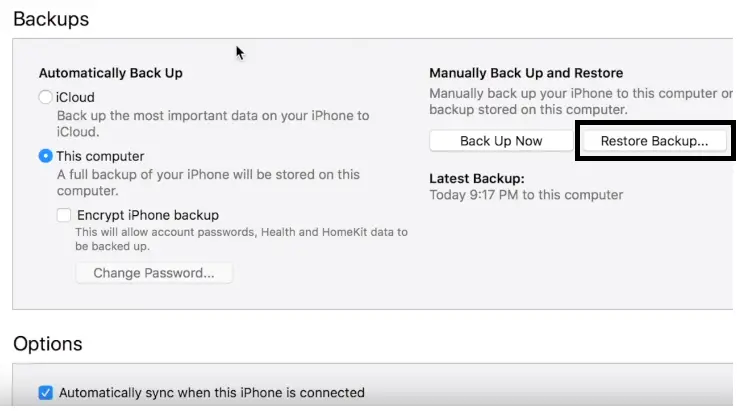
4. Now it will display you a pop-up window to choose a backup file from the available backups (pro tip: choose the latest/recent one from the multiple backup files)
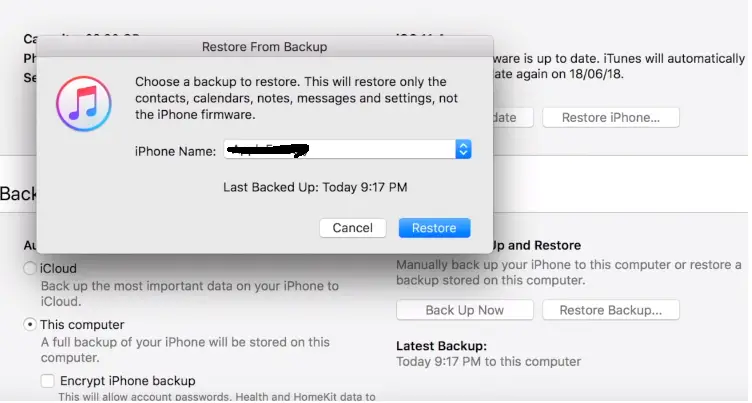
5. Click on ‘Restore‘ option (for the encrypted backup option , you have to password verify your restoration request)
6. After this your iTunes will start restoring your iPhone from the available iTunes backup .
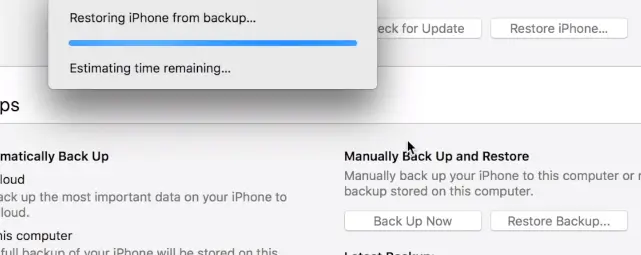
7. Simultaneously you can see a message ‘Restore in Progress‘ in your iPhone
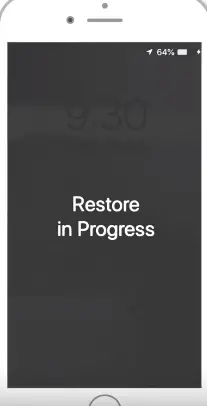
8. Wait for some time , keep your iPhone connected to your Mac/computer device
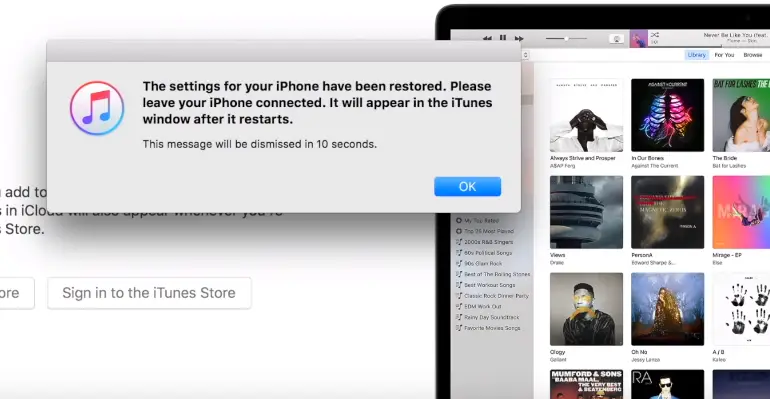
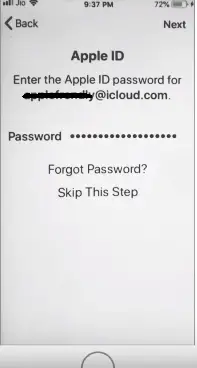
9. Now you need to start following the instructions on your iPhone like select the wifi network, give Apple ID password etc (it will automatically update your iCloud settings) ,
That’s all. Then you can see that some apps are still downloading from the Apple app store. The backed-up app data is already there but it takes some time to download the apps .
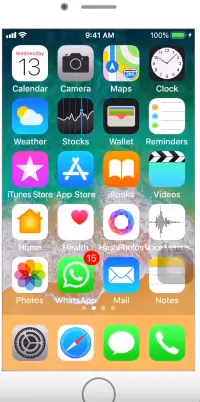
Once the above process ends , you are good to proceed further . Your complete data from the old iPhone gets transferred to this new iPhone .
How to transfer data from any Android device to iPhone (and also from iPhone to Android) ?
Now its time to understand the steps to be followed if you have an Android device . You made up your mind to switch over to the iOS range of devices .
Finally, you bought this new iPhone and you now desperately want to know the steps to transfer data from Android to iPhone device and vice versa .
How to Transfer Data From Android To iPhone ?
The below-given steps are for Android version 4 or above and the iOS version should be 9 or above (in iPhone 5 or later) . With this method, you can basically transfer some specific items from Android OS to an altogether different iOS OS environment.
The specific items mainly include your contacts , message history , camera photos and videos, Web bookmarks, Mail accounts , calendars , Free apps and their data (that are free in Apple play store as well)
Use an active and same wifi connection for both the devices i.e. Android and the iPhone . If you want to transfer Android data into some old iPhone device, then you need to factory reset this iPhone device (otherwise you have to transfer the data manually) .
Note : Before going through the steps , do make sure that the storage space is enough in your iPhone to handle the data transfer process from the Android device
After resetting go through the initial onscreen prompts to set up your iPhone device till you reach the screen ‘Apps and Data‘ .Here now you will see various options to restore data . Now follow the steps as below :
Note : If you have a new iPhone device , then also go through the regular set up process until you reach ‘Apps and Data‘ screen (as already discussed in the new iPhone set up section above) .Continue with the below steps now .
1. After going through the initial set up process , you are now in the Apps and Data screen as shown below

2. Tap on the option ‘Move Data From Android‘ in the iPhone screen (the ‘Move to Android’ screen should be visible)
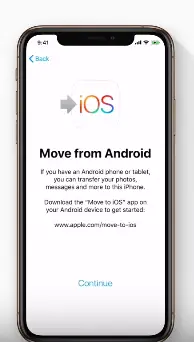
3. Now in your Android device , go to play store and install the app ‘Move to iOS‘ (safe and secure Android app)
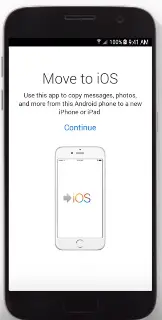
4. Tap ‘Continue‘ on your iPhone (the ‘Move to Android‘ screen should switch to next screen containing 6 digit code)
5. Open the installed Android app i.e. Move to iOS and tap ‘Agree‘ to the terms and conditions screen
6. Tap ‘Next‘ at the top right corner of your Android screen
7. Enter the code in your Android mobile , that you now see in your iPhone device screen
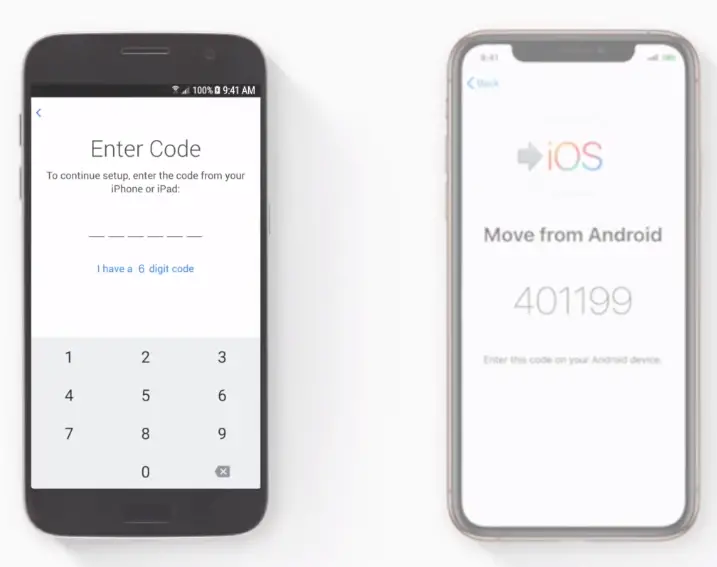
8. Both of your device’s screen now should load and take some time to display the next set of options
9. Now you can see ‘Transfer Data‘ screen in your Android device , select the things that you want to transfer and tap ‘Next‘
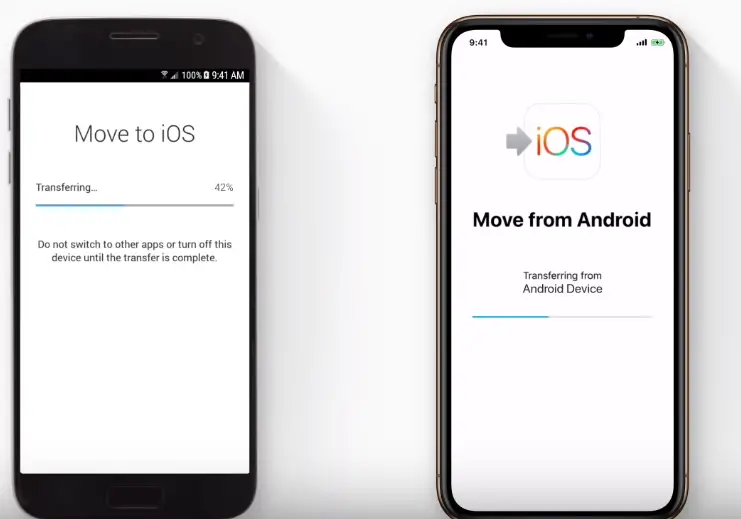
10. Now once the transfer completes you can see a screen ‘Transfer Complete‘ in your Android device. You can see many other details too here.
11. In your iPhone screen , you may still see the transferring progress screen , then finally it will change to the confirmation screen saying as ‘Transfer Complete‘
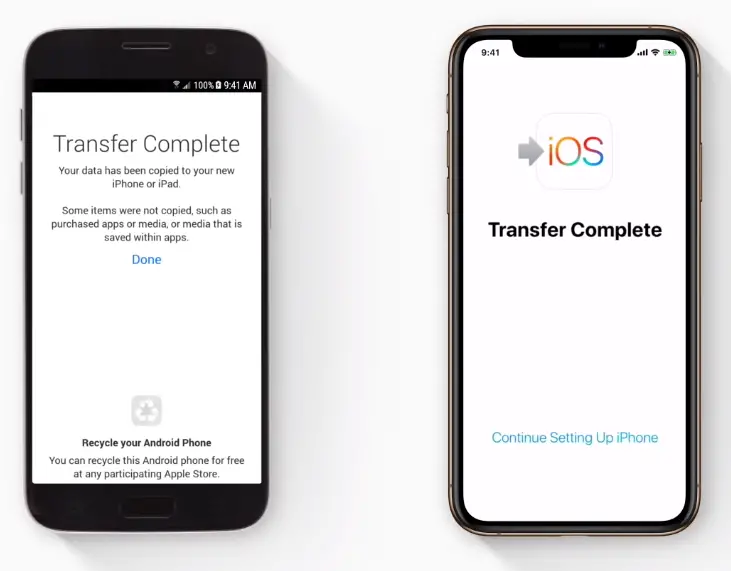
12. Once the transfer completes in your iPhone , tap on the option ‘Continue setting up your iPhone‘ just go ahead with the steps to continue setting up your iPhone , finally tap on the option ‘Get Started‘
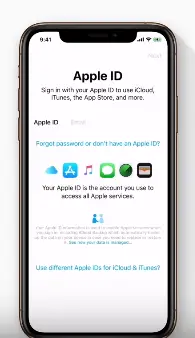
13. Once you see the iPhone screen , you will get pop up asking your Apple ID to download the free apps that you transfer from the Android phone
14. Tap on ‘Add Apps‘ , now you need to sign in with your Apple ID
15. Tap on ‘Use existing Apple ID‘ and finally, the process ends (you can even create a new Apple ID)
Note : After the above process you can see that all the apps start displaying (downloading from App store) , after a few seconds everything will be set up and you are good to go
How To Transfer Data From iPhone To Android Mobile Device ?
As seen above we can easily transfer all Android data from any Android device to a new iPhone with the help of an app called ‘Move to iOS‘ in the play store .
Now you decided to make a switch from iOS device to the Android OS device . The very next moment you search for the options to transfer iPhone data to your Android device .
Fortunately, the solution is not that complex. But here you may need to spend some few pence out of your pocket depending upon the needs and type of data that you wanna transfer . Here we will see two options or ways to accomplish our requirement .
First, we will use one Android app (from play store), and secondly we will look into one useful software.Before you start exploring the steps , just make sure that you have enough storage space in your Android mobile .
So let us start with our first way , just follow the below steps :
Note : Both the methods will be wireless and for the first option there is no need of a computer or your iPhone device too
1. Go to play store and install an app called Mobiletrans (free to download)
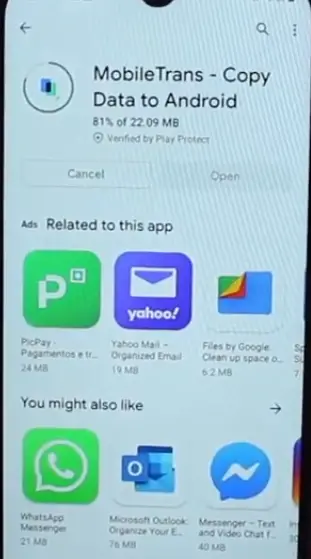
2. The app is safe and secure to download , install the app in your Android device
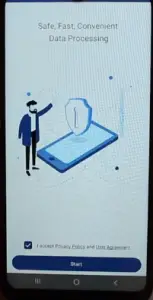
3. Open the app and tap on ‘Start‘
4. Then you can see two options , to transfer data by connecting both (using USB) the Android and iPhone devices to transfer data and the second option is to transfer wireless (using iCloud backup) .
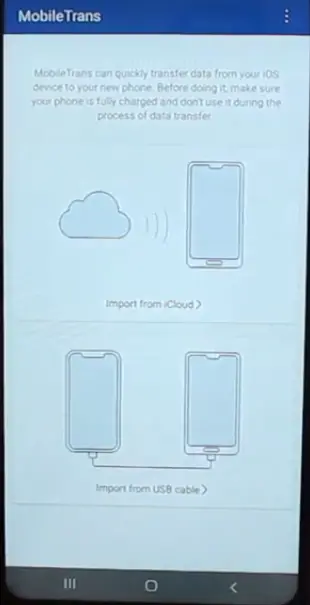
5. So we will select the second option , tap on it
6. Then enter your Apple ID and password in the next screen
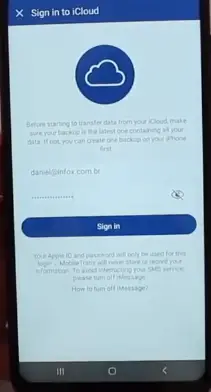
Note : Make sure you already saved everything in iCloud from your iPhone (already explained the process of taking backup above)
7. Apple sign-in request will be sent to your iPhone , you need to allow it and get the verification code
8. Enter the verification code in your Android phone now, tap ‘Verify‘
9. Then you can see all the info and data as saved in your iCloud account will be displayed in your Android mobile (Calendars , contacts , Photos, Videos, and Reminders)
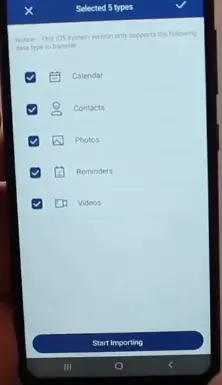
10. Now one important thing is if you want to use the app for free, you can just transfer photos from iPhone to your Android phone .
If you subscribe for the paid version , then you can get to transfer any/all of the above-mentioned data (yearly subscription is there and it’s pretty cheap)
11. Select the data you want to transfer , tap on ‘Start Importing‘
Wait for some time and finally all done. Exit the app and do check your transferred data .
The next process/way is all about one software (specifically meant for any cross/same platform device recovery/transfer/ formatting/repairing etc) .This is also useful for transferring data in between any two mobile devices (iOS/Android).
Download the application ‘iSkysoft Toolbox‘ application , available for Windows and Mac OS . And then follow the below steps :
1. Since we are only interested in the data transfer between devices , just click on the option ‘Switch‘ in the software
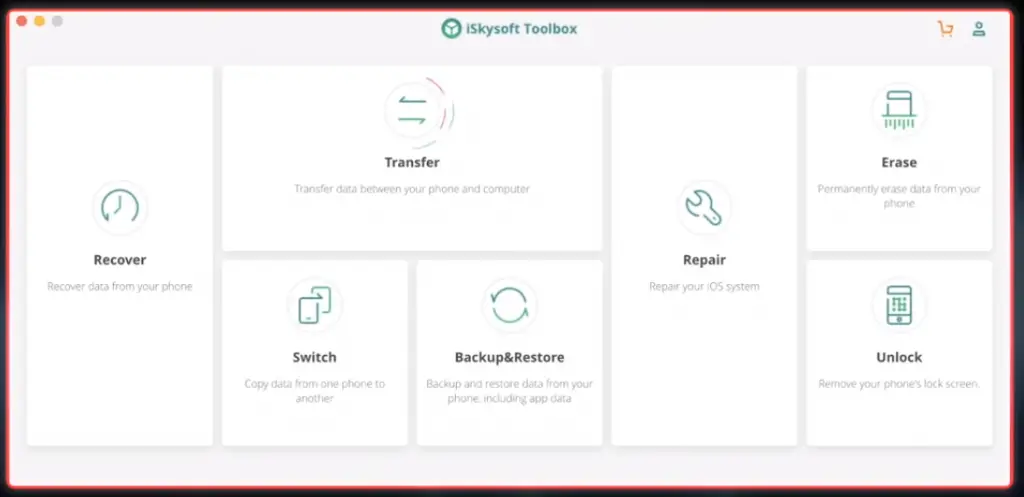
2. Connect both the mobiles (in our case one is iPhone and the other one Android) to your computer via USB cable
3. Allow all the pop-ups that you receive in your mobile devices (trust this computer , secure connection etc)
4. On the left side, you can see source device (the mobile device from which you want to transfer/send data) , and on the right side you have destination device (the device which will receive the sent data)
5. In our case, we have Source as the iPhone device and destination as the Android device (you can even flip the source & destination devices)
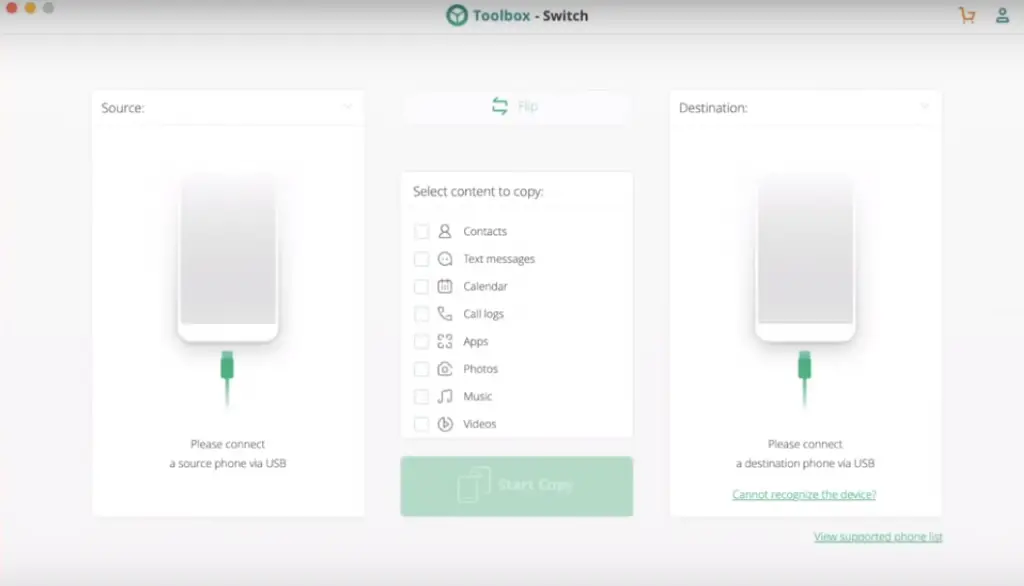
6. Once both the devices connected , you can see all the data of the source in the middle , just select the data that you want to transfer
7. Click on ‘Start Copy‘ (just tap ‘ok‘ to any pop up to your mobile device now)
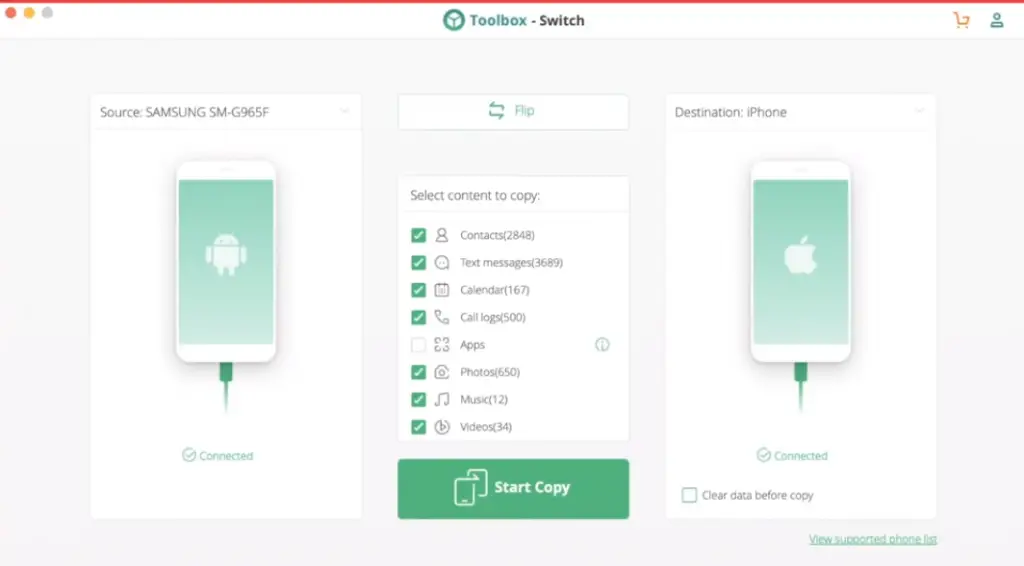
8. Now finally you can see ‘Copying Data‘ progress window , it will take time depending upon your data size and amount
Cons : One major drawback is that this software is not free , you need to pay some amount for the same
How To Transfer Data From Old iPhone To New iPhone Without iCloud or iTunes (Using Advanced Data Migration Feature) ?
This is basically a newer and most convenient way of data transfer between your iOS devices . For this feature of data migration between your iPhone devices , you need both the devices should be running iOS 12.4 or newer versions.
It may happen that you don’t have access to iTunes (or computer) or iCloud (iCloud backup) , here comes the new data migration feature comes into play.
For this feature, you still need an active Wifi connection to transfer data from your old iPhone to the new iPhone wirelessly (or wired as you wish) .
With this, you can transfer all contacts, app data , media files , settings etc to your new iPhone . If you want you can even transfer then with a wired connection (you need lightning to USB cable and your lightning cable) .
Note : Go for the wired method if only you have a poor network connection at home otherwise the wireless way is the recommended method here
Follow the steps as given below :
Note : The below method only works when you have a brand new iPhone which you just turned ON for set up . So you can now see the ‘Hello‘ screen in your new iPhone , you are now fine to follow the below steps after this (if you have an old iPhone , you need to factory reset the device to get that ‘Hello‘ screen and then follow the normal set up process)
1. Set up your new iPhone as mentioned in the above section (once you see the’Quick Start‘ screen in new iPhone , you should receive a pop up in your old iPhone to scan a code in your new iPhone screen.
Then just hold the camera of your old iPhone above that code to start the setting up process in your new iPhone)

2. Once you set up your Face ID , in the next screen you can see a new screen named ‘Transfer Your Data from (your old iPhone name)‘
3. Now you have two options first ‘Transfer From iPhone‘ and second ‘Download From iCloud‘
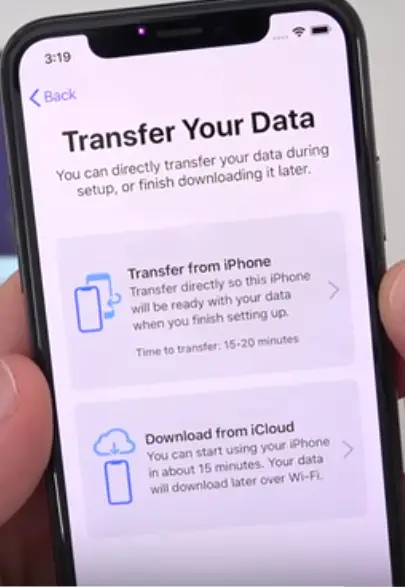
4. Tap on ‘Transfer From iPhone’ option (then you need to continue with the setup process as usual like Apple Watch , Apple Play , App Analytics settings etc)
5. Finally, you see a screen named ‘Transferring Data From (Your old iPhone name)‘ , and also now in your old iPhone you can see the same screen showing transfer progress screen (be connected to the Wifi network)
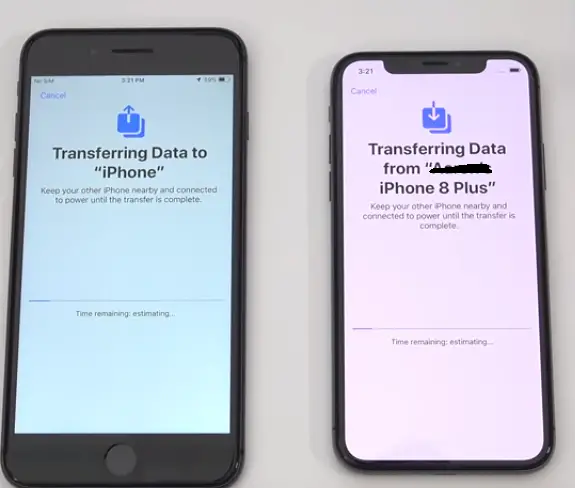
Note : The data transfer is happening by means of the peer to peer data transfer mode using Wifi and Bluetooth
6. Wait for some time (depends on your network , if you want faster transfer anyways you can opt for the wired mode of transfer)
7. Once done tap ‘Continue‘ on your old iPhone (Transfer complete screen)
8. The new iPhone starts a reboot now , once its fully rebooted check for the data and settings (it should be an exact replica of your old iPhone)
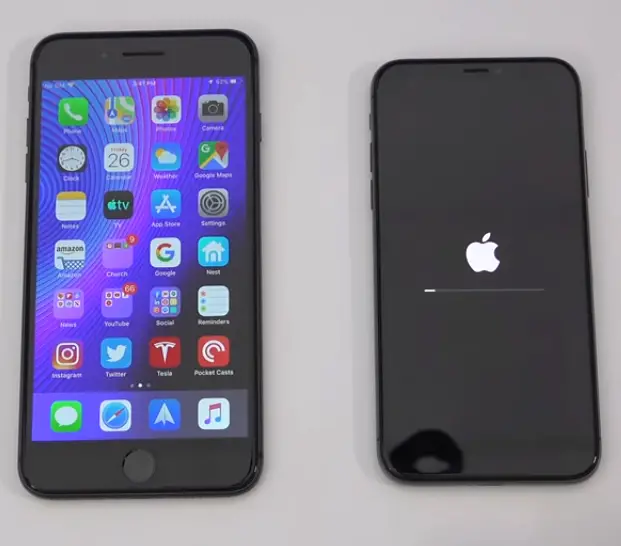
9. You can still see some apps are downloading from the App store (the app data is already downloaded so no need to worry)
Finally you can get rid of your old iPhone , just do remember to erase all your old iPhone data before selling/leaving your old iPhone for security reasons .
How To Transfer Data Between Mac and iPhone device ?
So you want to keep a physical copy of all your iPhone data now on your Mac computer. Or you just want to keep everything in your external hard disk , and just want to clean up your iPhone storage space .
Whatever be the reasons, the next moment you start searching for the steps to transfer all your old iPhone data to your Mac device or vice versa .
Note: Make sure both your iPhone and Mac are in the same wifi network
Now in this section, we will look into the steps to do a simple data transfer (photo/video) between your Mac and iPhone device . So let us start exploring the steps now :
Note : This process works for any Mac OS versions , so no need to worry anymore for your outdated Mac OS version (cheers !!)
1. Do a spotlight search for ‘Image Capture‘ or go to your ‘Finder‘ and in the application try to find for this app there (inside ‘Other‘ folder)
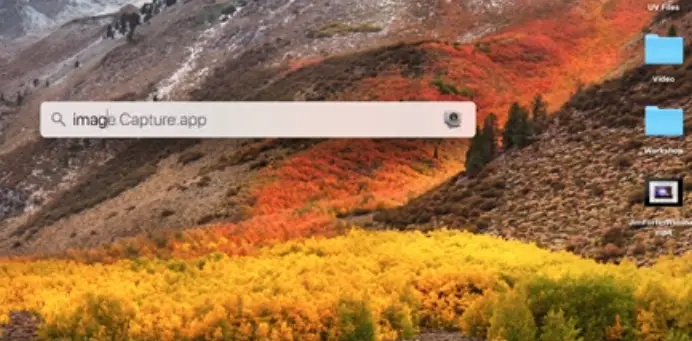
Note : Before this, in your iPhone , Go to settings –> Tap on ‘Photos‘ option —> Go to the section at the bottom ‘Transfer to Mac or PC‘ —> Tap on ‘Keep Originals‘ option
2. Open the ‘Image Capture‘ app in your Mac OS and then plug in your iPhone to Mac PC
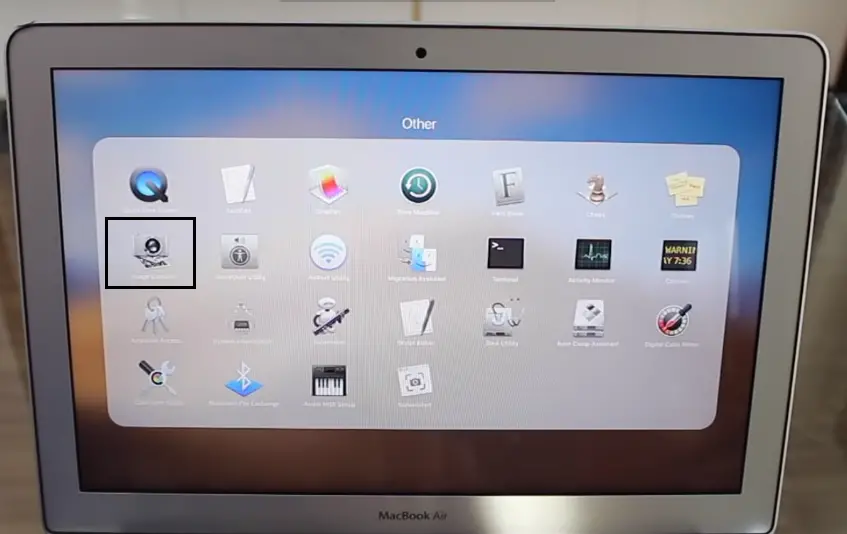
Note : Your iPhone must be unlocked to use this method, once you unlock your device , then only you can see all your image/video in the ‘Image Capture‘ application in your Mac PC
3. You can see all the photos and videos and those will be displayed in the Mac screen with many details (tap ok for any onscreen pop-ups you receive in your iPhone screen during the connection)
4. From the screen just go to any specific photo/video , from here you can easily delete it to clean up your iPhone space
5. Also at the bottom left side of the screen, you can see the option ‘Import To‘ , just go there and click on the drop down arrow to select the destination where you want to keep all your photos and videos.
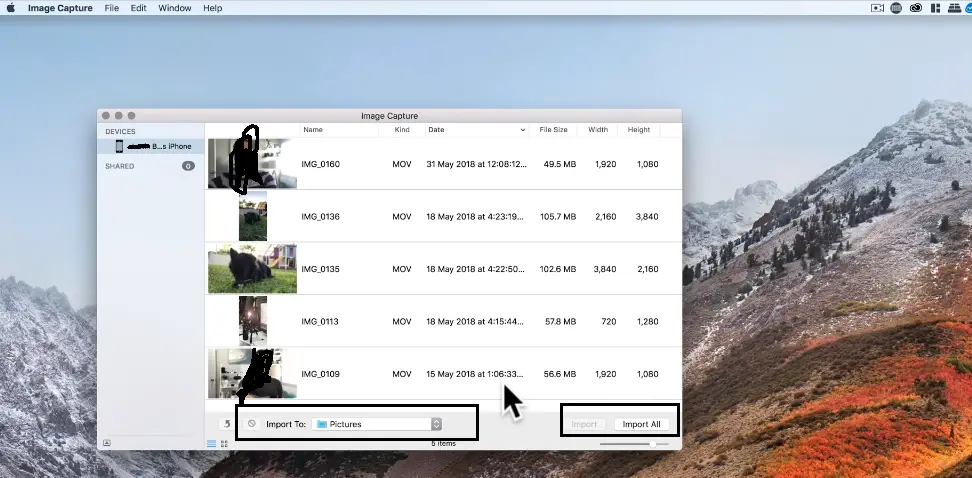
6. At the bottom right corner , there will be two options ‘Import‘ and ‘Import All‘ , just select the options based upon your requirements (you can even simply drag and drop to desktop)
How To Transfer All The Data Files From iPhone To Mac Computer Using Airdrop ?
In the above section, we have seen the steps to transfer only photos/videos from iPhone to Mac device . Now we will see for all types of files to Mac computer .
Make sure that both the devices are connected to the same wifi. As there are several ways to do this, we will first see the ‘AirDrop‘ method now. Just follow the steps as given below :
1. Switch on ‘AirDrop‘ in your iPhone , go to notifications panel , swipe up from downwards and tap on the ‘Airdrop‘ option (or go to settings –> General –> AirDrop option –> Tap on ‘Everyone‘ and switch on AirDrop in iPhone)
2. Then tap on ‘Everyone’ (to make yourself discoverable to other devices and once you switch on this, the Bluetooth option will get automatically switch ON)
Note : Also switch ON AirDrop in your Mac device, do a spotlight search and type in AirDrop , then turn on this and select for ‘Everyone‘ option (also you need to switch your device Bluetooth ON for this)
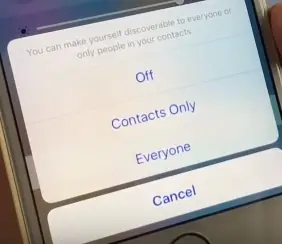
3. Now open any file (photo/video/document) and tap on the ‘Share‘ icon
4. Then select the option under ‘Tap to share with AirDrop‘ section , here you by default see your Macbook device name
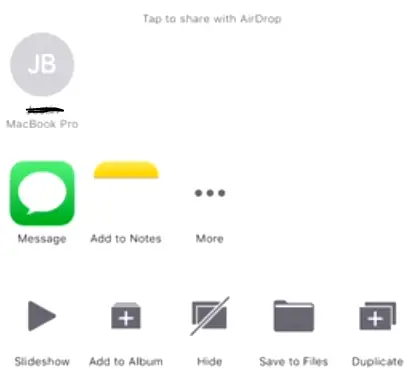
5. Just tap on the Mac device name and it will show you a pop up in your Mac screen (you need to accept that and also set the location to save the file in your Mac device)
Wait for some time (depends on your file size) , then once the transfer completes, now go to Finder and open the location where you just now saved the file . It should be present there .
Note : You can also use the iTunes way of taking data backup first and then restore the iTunes backup in your new iPhone which indeed requires a wired connection .
Please refer to the iTunes section above for that method to transfer and restore the iTunes data .
How To Transfer Files From Your Mac To iPhone Device ?
As already mentioned if you want to just restore the data from your iTunes backup then you can just refer the section above where we have explained the iTunes backup process .
For that, you need a wired connection though using a lightning connector and USB cable.
Depending on the software running on your Mac or PC the next step will either involve the Finder on a Mac or iTunes on Windows (or on a Mac running an older version of mac OS).
macOS Catalina
1. If you are running Catalina open a Finder window
2. You will see your iPhone or iPad on the left side of the Finder window under locations
3. Click on it
macOS Mojave or older
If you are running Mojave or older on your Mac you will need to open iTunes.
There are multiple versions of iTunes you could be running and the method is different for each:
iTunes 12
Click on the iPhone’s icon in the upper-left corner of the iTunes window.
iTunes 11
Click on the iPhone tab on the right side of the window.
iTunes 10
The iPhone will be in the sidebar on the left
Once you see the iPhone details section , follow the steps as given above in the iTunes backup section to restore the backup files you want to transfer from Mac to iPhone device.
Now the best way is to use the wireless method for transferring data from your Mac device to the iPhone using the AirDrop feature . For using this feature just make sure that both the devices are connected to the same wifi network.
Now once you switch on AirDrop (and also the Bluetooth) in both the devices, you can easily start transferring data files between both the devices .
Just follow the below steps for doing the file transfer :
1. Select the file (image/video/document/or any file) ,right-click and click on ‘Share‘
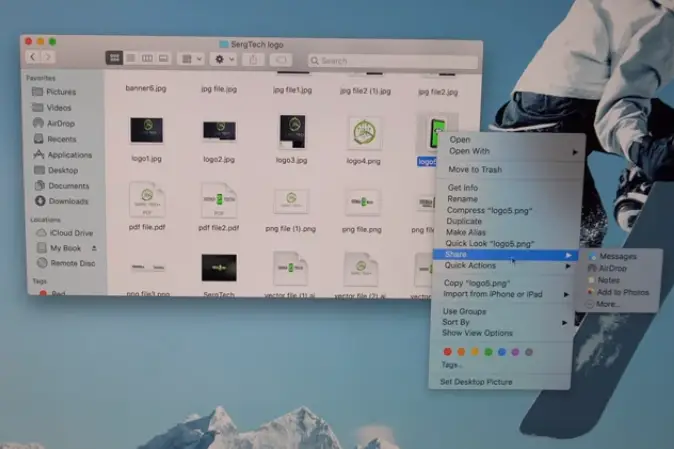
2. Select the option ‘AirDrop‘ (it will show you the discoverable devices now , select your iPhone name in the list of devices)
3. Then it will send a confirmation pop up in your iPhone ,you simply need to tap on ‘Accept‘ (or ‘Reject‘ as you want)
4. Once you tap on ‘Accept‘ , the file transfer will start and status can be seen in your Mac device screen .
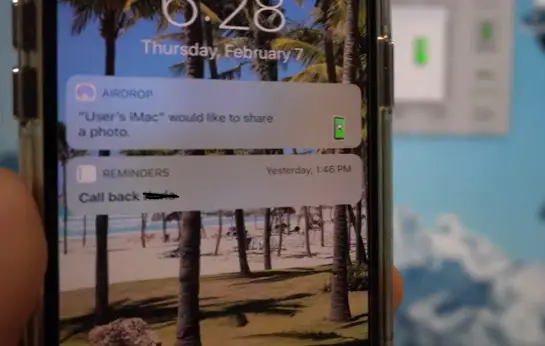
5. Once done , a confirmation pop up can be seen in your Mac device screen . You can now check the transferred file in your iPhone .
Transfer Data To Your New/Old iPhone – Final Wrap Up !!
As seen above , we tried to cover almost all possible ways to transfer data to your iPhone from any other iPhone /Mac /Android /Computer device easily via wired or wireless medium .
Also do remember that you should first erase all your data from the old iPhone before you abandon/sell that old iPhone .
We really hope that you enjoyed this post and you got to learn something new . Apologies for such a big post though (:-p) . Stay tuned for more interesting stuff in this series.

Aric is a tech enthusiast , who love to write about the tech related products and ‘How To’ blogs . IT Engineer by profession , right now working in the Automation field in a Software product company . The other hobbies includes singing , trekking and writing blogs .

