How To Use Laptop As Monitor (External Second Screen) – Simple Two Ways Step By Step Guide !!
Sometimes we just want to extend our laptop/desktop screen to some other secondary screen (Laptop / Desktop) for better efficiency/productivity. Whatever be the reasons, in this post we precisely gonna see the two most common ways to use laptop as a monitor (extended display screen).
With a secondary screen, we basically mean that you will have a primary screen (desktop/laptop) and then you can extend this screen to any number of secondary display screens (laptop/desktop). The secondary display device should be in the same wifi network in this setup.
Without wasting any further time, let us dig deep into the 2 absolutely free ways to accomplish the screen extension set up to enable you to view your primary display screen to any secondary extended screen seamlessly.
So instead of buying any dedicated secondary display, you can just use an old unused laptop/desktop as a secondary screen which can surely improve your productivity and enhance multitasking indeed at any point in time.
Before we start, let us first understand some basics for better clarity of the technicalities involved in this complex (yet easy) connection process of extending screens in any laptop/desktop. (feel free to skip the basics part and jump directly into the practical steps if you want to do so)
Note: In this post, we will often use the terms Primary and Secondary device/system. Just keep in mind that the Primary system is the device from which you want to extend the screen to other devices, whereas secondary devices can be one/multiple to which you want to see the extended displays.
In short, the Primary machine is always one and Secondary machines can be one or more.
What Exactly Is This Process Of Using Laptop As Monitor In Reality?
There is an inbuilt projection display set up in your Windows 10 PC (we will explain the steps below taking Windows 10 devices into context in both the ends). So with the Windows projection, it typically acts like an extended display set up.
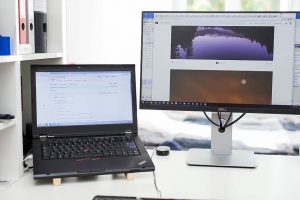
It basically allows you to run applications into your secondary computer display. In layman terms, we can say that you might think the secondary system as an extended monitor that is wired to your primary laptop/desktop.
Now in the real setup, we don’t have any wires between the two systems. Rather they will be connected via the same wifi network. And the second monitor will be your typical laptop/computers precisely.
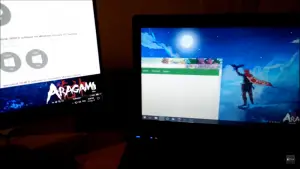
So in this setup, everything you see and interact with will be your primary computer. You will just be using your secondary computer as the extended screen display.
Similarly, you can just go on adding devices to this extended set up (maybe two, three and so on). So you just want a working monitor screen of the device that you wanna use it as a secondary monitor. (no need to care about other accessories)
Do You Really Want To Use Your Laptop As Monitor? (Some Advantages)
Now you might think the merits of using such a set up obviously. It mainly depends upon your usage levels and business needs. So some of the proven benefits of using this kind of extended display setups are listed below :
1. You can see a football match in one screen and simultaneously work upon your deliverable on the other screen. So it mainly improves multitasking.
2. You can run multiple apps at one time, see chat window in one screen, and executing the manual guide on the other.
3. You can open and compare two separate documents side by side and note down the observations.
4. Stream your favorite TV show and at the same time making an important presentation.
So in a nutshell as seen above, the extended screen set furnishes the much-needed multitasking capabilities to a great extent.
How To Use Laptop As Monitor (Desktop) Using The Built-In Windows Projection Feature?
Now here comes the showtime. So there is a built-in screen projection feature in your Windows 10 PC which now helps us to achieve the required screen extending process.
Before we jump into the steps right away, let’s have a glimpse of the requirements you should check beforehand. Some of the prerequisites are as follows :
1. Both your primary and secondary screen should have the latest version of Windows OS i.e. Windows 10 installed.
2. Both the systems (laptop/desktop) should be in the same wifi network. (if more devices you have, make sure all the devices in the same wifi network)
3. The screen in your secondary display device should be in working condition. (same goes for all other displays. if you have multiple screens)
Steps To Use Laptop As Second Monitor (Or Multiple Screens) Using Windows Built-In Feature !!
So you need to follow the below steps to enable this screen extension process. Get the second system and turn it ON, which you want to use as the second monitor along with the primary screen. Once your second laptop/ monitor is ON, follow the below steps :
Note: All the below steps are for the secondary system (laptop/PC)
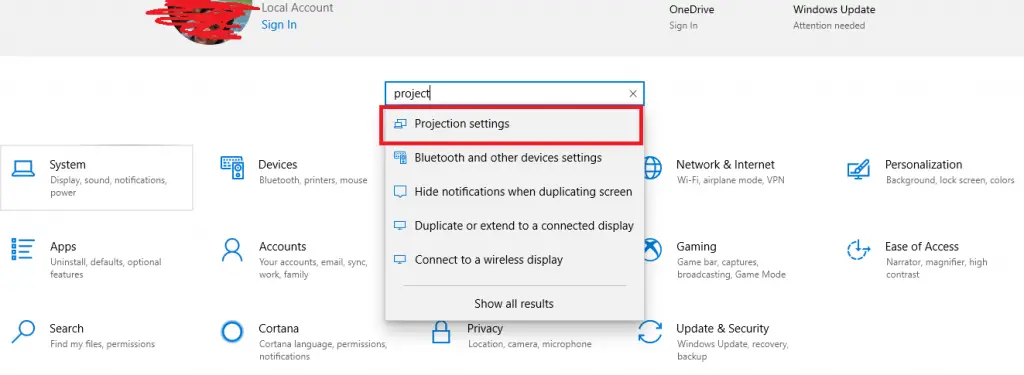
1. Go to ‘Settings‘ and search for the ‘Projection Settings‘ in the search option, then click on the option to select it in your secondary device screen
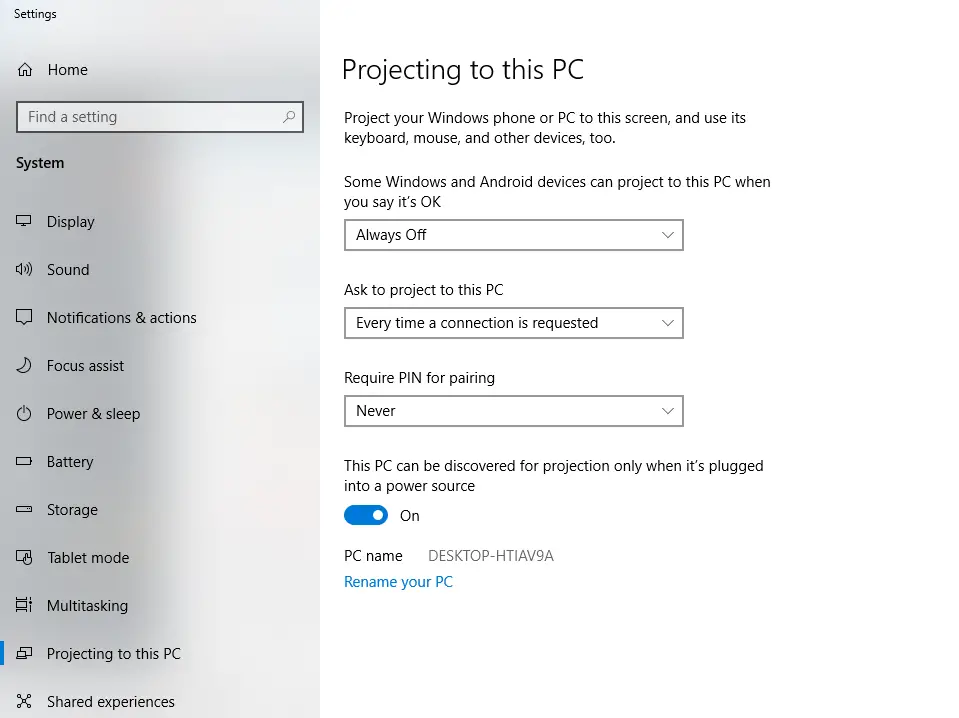
2. Now you will see the ‘Projection Settings‘ screen, from here you can do/edit all the settings you want while projecting to this system screen as you wish.
3. The first thing you may notice is one red marked error (kind of warning). This warning is common if your second system is not compatible enough with the graphic requirements for this process. This is most common in all the older devices and not the newer models.
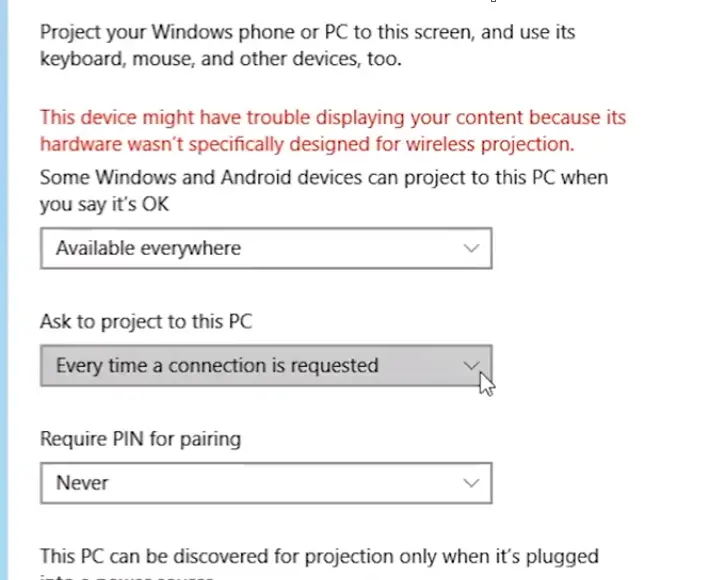
Note: With this warning too you can enable the device for Windows projection, but you may face extreme slowness or latency issues. If no warnings observed then just ignore this step and move forward.
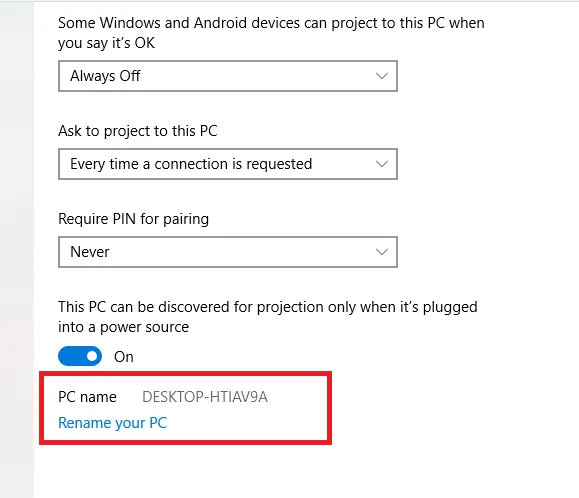
4. Then select the option ‘Available Everywhere‘ in the first option make sure this device is discoverable for projection to other devices
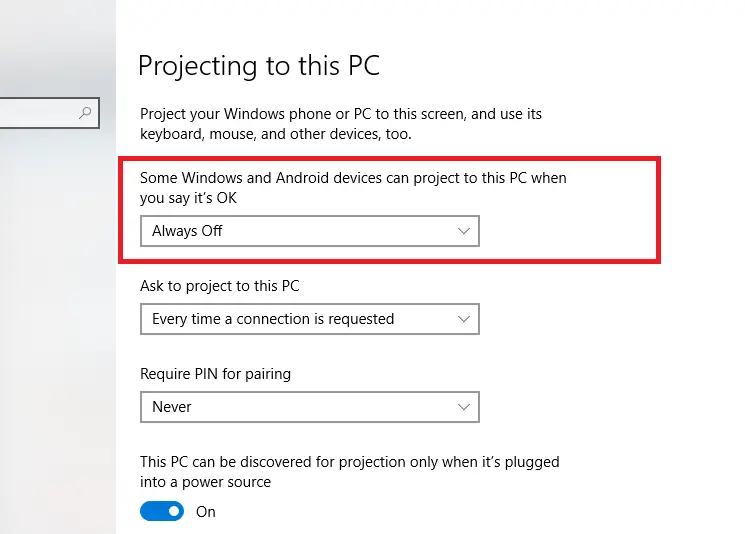
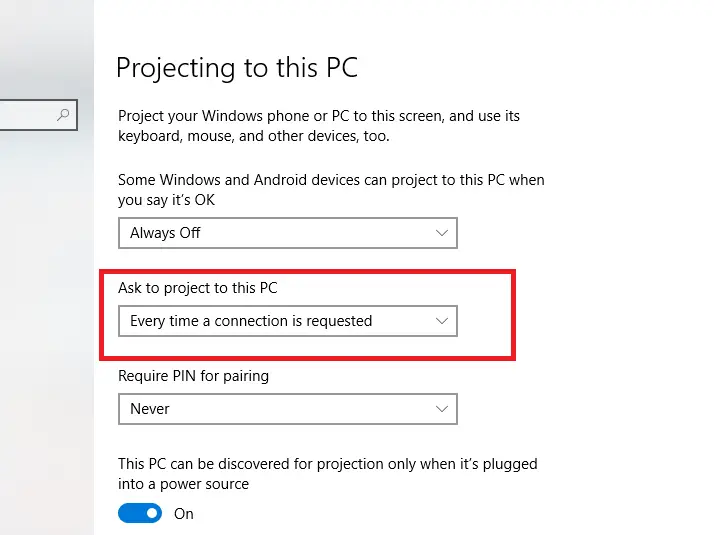
5. Now in the next option, select option ‘First time only‘ if you don’t want the prompt always on any projection request. Or else choose the other option as required.
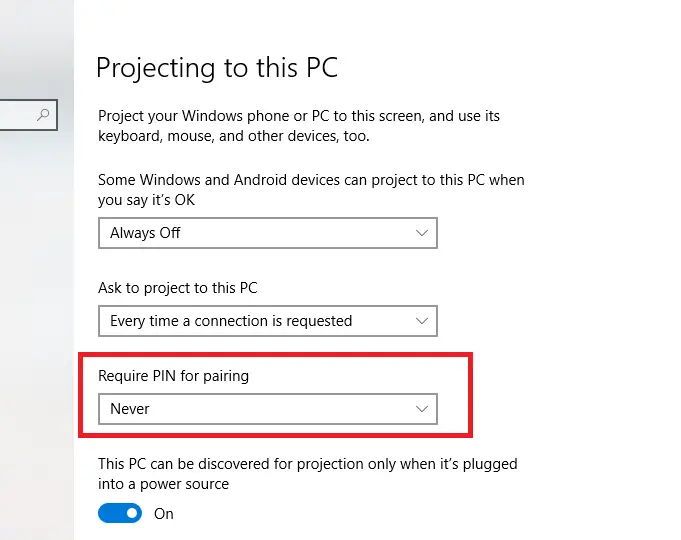
6. Next, you can set up a pin as the security measure if you are using these processes in any public network . Else select the option ‘Never‘ in your private network. This is recommended for public connections or shared devices
7. Now the next is the toggle option to allow projection only when the device is connected to the power source. Keep this Off or On as required
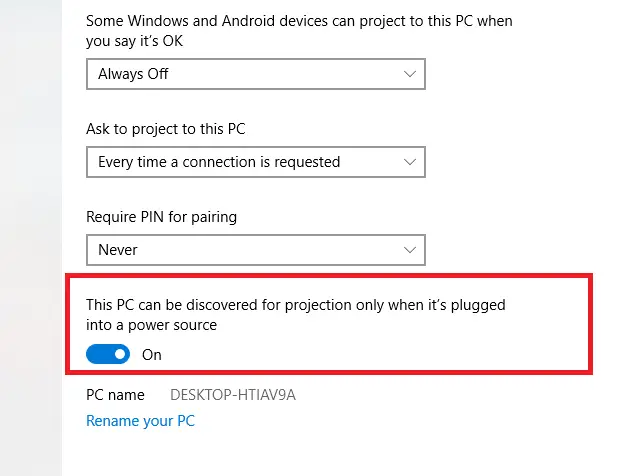
8. Note down the name of this device, as this will be required to connect once we try projecting the screen from our primary laptop/computer to this secondary device screen.
Steps To Do In Your Primary Laptop To Enable The Screen Projection !!
Once you set up the secondary device (laptop/PC), its time to enable the projection feature now in our primary device. Just follow the below steps as mentioned in your primary device :
1. Click on the message notification center in your Window device (at the bottom right corner), nowhere click on the option ‘Project‘ to or simply press the buttons shortcut ‘Windows button + P‘
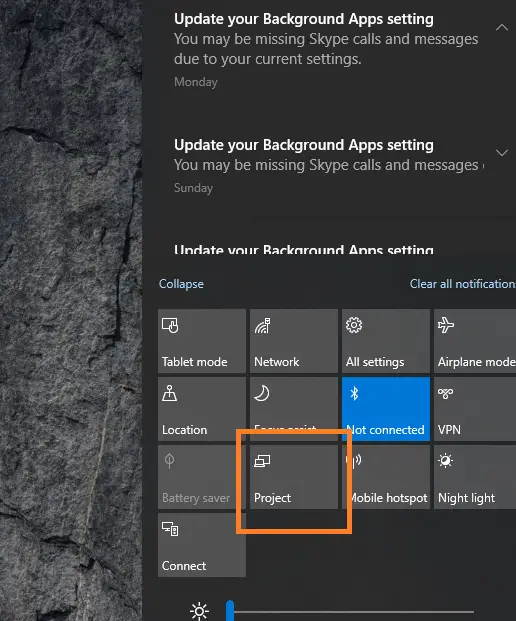
2. Now you can see various option popping up on the right side of your screen, you need to select the option ‘Extend‘ to enable the screen extension process to the second monitor (Select how you want the screen to be displayed)
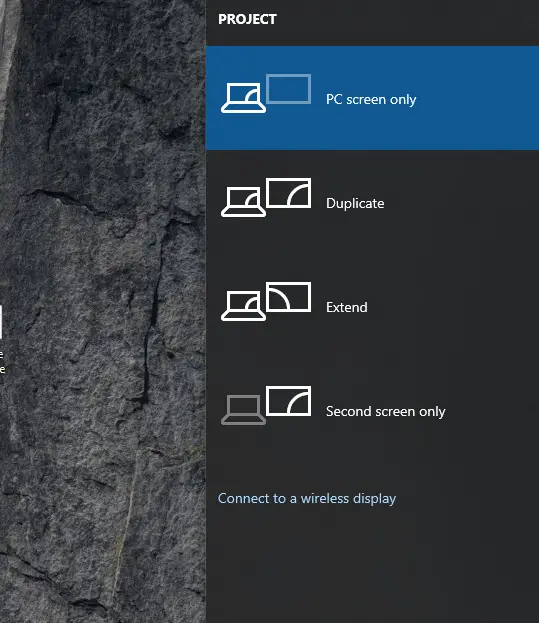
Then click on the option ‘Connect to a wireless display‘ at the bottom
3. You should now see your laptop device name as an option for connecting, select the name of the screen that we saw in the last step in the previous section (Step 8)
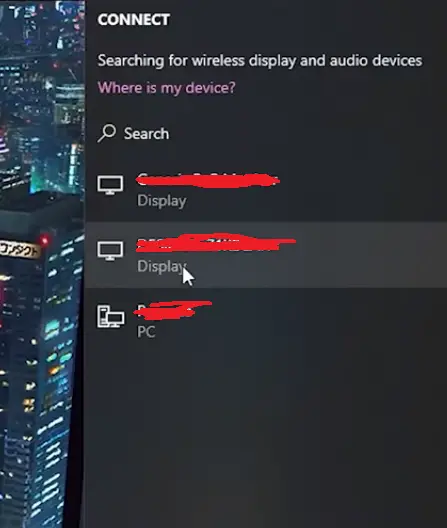
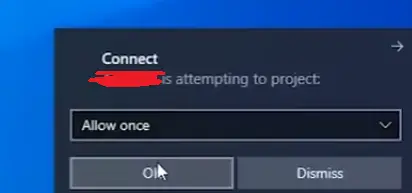
4. Just approve the notification you will get now in the secondary device screen, once approves the screen extension process will start right away.
5. Finally, once your work is done and when you are finished using the second laptop, be sure to select “Disconnect”
Here comes the end of the first method. Now let us proceed with the next free method to use your laptop as monitor quickly using third-party software.
How Can You Use Laptop As Monitor Using A Software?
There is much third-party software available to help you use your second system as an extended screen, but the best one is Spacedesk . With this software, you can easily do screen duplication (mirroring/clone) to other devices along with the screen extension support.
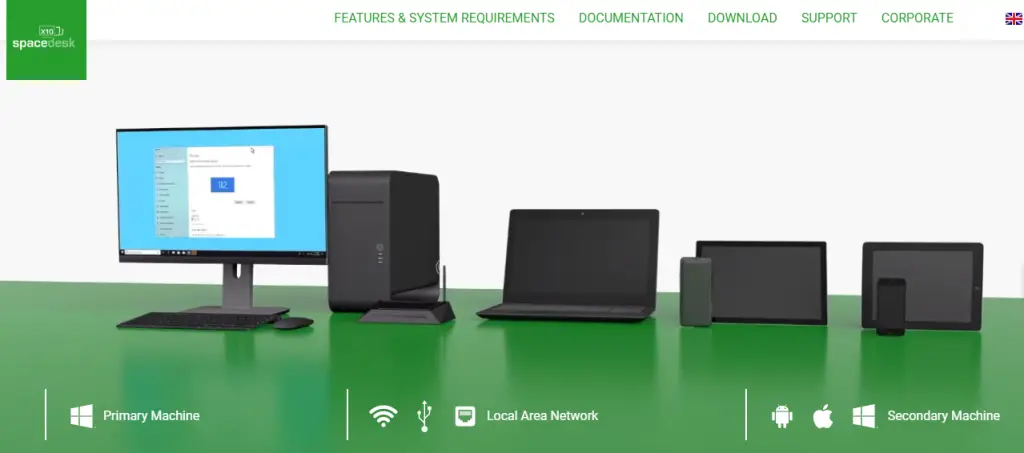
So without wasting any further time, let us understand the steps to use your laptop/desktop as an extended monitor. Follow the below steps :
Note: Before following the below steps, just make sure that both your primary and secondary devices should be in the same LAN connection (wifi network)
1. Download the Spacedesk software on your primary laptop/desktop PC and install it .
Use this link to download the software version for the primary device (go to the downloads section) : Download Here
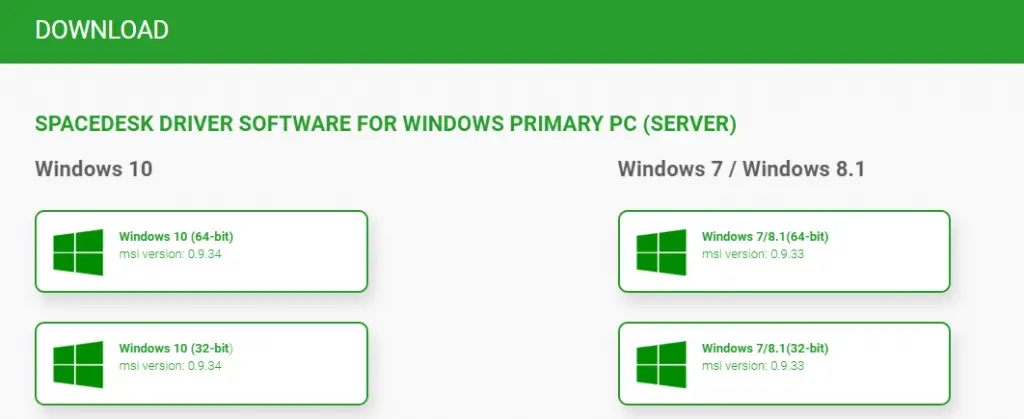
2. Download the Spacedesk Viewer software for the secondary system to which you want to extend the primary device screen .
Use this link to download the Spacedesk Viewer software for the secondary device (go to the downloads section) : Download Here
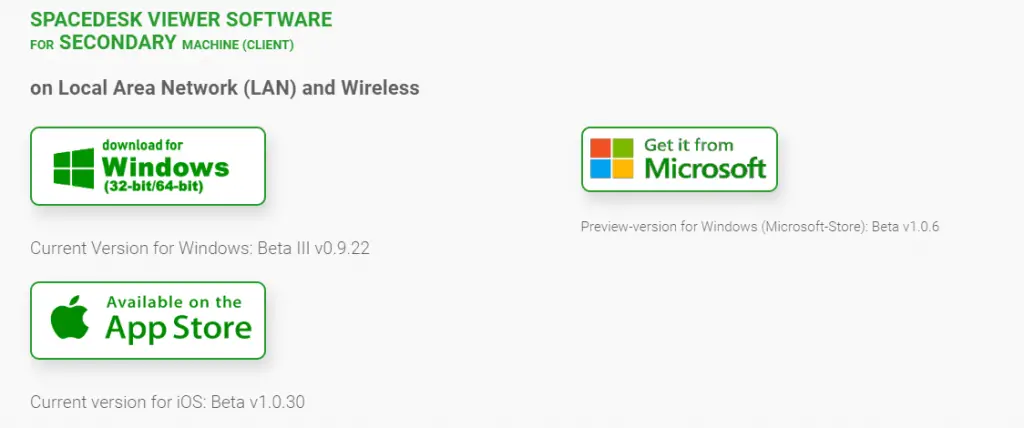
Note: Download the software based upon your Windows OS Version requirements (whether it’s 10/8/7 etc)
3. Once downloaded, open the Spacedesk Viewer application in the secondary device, then you can see the name of the primary device on the screen. Just click on it to connect to the primary device (both devices should be in the same wifi network).
4. Now you can do whatever you want in your primary device screen, and can successfully able to drag/extend the screen to make your laptop screen as an extended monitor.
Also, keep in mind that just download this software from the official site only. Visit here Spacedesk.net to access other features in the software.
One of the biggest advantages here is that this software supports older Windows OS versions as well i.e. Windows 7 & 8 respectively. So if you have any old version Windows OS , just use this software efficiently to extend your primary screen.
Using Laptop As External Monitor For Screen Extension – Is It Any Good ?
So frankly speaking you can use the above mentioned free ways to use your laptop/PC as monitor easily to enhance your productivity no doubt. However, if you have older versions of Windows PC or old device with less or no additional graphics support, then you may face difficulty.
For the first method , it is really a useful way of extending your screen for multitasking . But if you want to play any graphic intensive games with the above-mentioned techniques, it will not be a good decision indeed.
The major limitations here will be the latency issue/screen lag. There may be occasions when you will be suddenly disconnected from the connected primary display screen device and again needs to repeat the same steps as above.
I hope you really liked this post about the steps to use your laptop as a monitor . Stay tuned for more interesting stuff in this series.

Aric is a tech enthusiast , who love to write about the tech related products and ‘How To’ blogs . IT Engineer by profession , right now working in the Automation field in a Software product company . The other hobbies includes singing , trekking and writing blogs .

