How To Print Screen In Windows 10 Easily [ Screenshot In Windows PC ]
So you want to take a screenshot in your Windows PC , and now you are desperately searching for the steps to do so . In that case, I must say that you are in the right place .
In this post, we will look into the steps required to easily take the screenshot in any Windows Device . Also, we will explore the every minute details required for the print screen Windows functionality later in this post .
![How To Print Screen In Windows 10 Easily [ Screenshot In Windows PC ] How To Print Screen In Windows 10 Easily [ Screenshot In Windows PC ]](http://electronicsguide4u.com/wp-content/uploads/2019/10/pc-1586306_640.png)
So before we start with the steps , let us first understand the basic meaning of this term in layman terms.
What Is This ‘ Print Screen In Windows ‘ Functionality (Screenshot in Windows 10) ?
A screenshot basically means the image of the screen you are working around . So if you want to simply take the image of the complete/partial screen in your desktop Windows PC , then you have to learn the steps to do so . In other words, we can term this as the print screen functionality ( i.e. taking the print of the current screen you are working around) .
So in Windows PC , taking a screenshot is super easy and includes very minimal efforts to accomplish this task . So without wasting further time , let us now dig into the steps to do this indeed tough task ( just kidding !!) with the very straightforward steps as given in the next section .
So we will look into the steps for all the possible combinations of ways in which one can take the screenshot in Windows PC .
1. Using the ‘ Print Screen Windows ‘ Functionality to take the Screenshot
So we will first start with the most basic and simplest way of taking a screenshot in any Windows PC . So here we will directly use the inbuilt print screen button present in the keyboard of your PC . So just go ahead and search for the button named as ‘ PrtScr ‘ present adjacent to the F12 button in your keyboard .
![How To Print Screen In Windows 10 Easily [ Screenshot In Windows PC ] How To Print Screen In Windows 10 Easily [ Screenshot In Windows PC ]](http://electronicsguide4u.com/wp-content/uploads/2019/10/windows_ss_1.png)
So when you hit the print screen button in Windows PC (the PrtScr button in the keyboard) , nothing will happen, but in reality, in the background , the screenshot has been saved in the clipboard .
So now if you want to use it , you just have to open an image editor application (and paste the screenshot by giving the command as Ctrl + V) like the Microsoft Paint , and then just save the image in whatever format (png or jpeg etc) as your requirement .
2. Screenshot on Windows PC for a specific region (and not the complete screen)
Now here our requirement is to take the screenshot of a specific area and not the full screen (as seen above) . So here also we have to hit specific combinations of a keystroke in order to achieve the desired result . So now we need to hit the buttons ‘ Windows logo button + Shift + S ‘ to take the screenshot in the clipboard.
![How To Print Screen In Windows 10 Easily [ Screenshot In Windows PC ] How To Print Screen In Windows 10 Easily [ Screenshot In Windows PC ]](http://electronicsguide4u.com/wp-content/uploads/2019/10/windows_ss_2-1024x394.png)
After hitting the buttons together, we can see that a ” + ” mark icon appear in the screen and the background will become dark (bit of) . Then you have to drag your mouse over the area where you want to take the screenshot.
If you want to abort this task abruptly, then go ahead and press the ‘Esc‘ button, the task will be aborted and no screenshot will be saved .
![How To Print Screen In Windows 10 Easily [ Screenshot In Windows PC ] How To Print Screen In Windows 10 Easily [ Screenshot In Windows PC ]](http://electronicsguide4u.com/wp-content/uploads/2019/10/windows_ss_10.png)
On selecting the desired region, just leave the mouse and the screenshot of the selected area will be saved in the clipboard . Again you have to paste it somewhere by hitting buttons ‘ Ctrl + V ‘ (remember that this shortcut is present only for the Window’s 10 creator update ) .
![How To Print Screen In Windows 10 Easily [ Screenshot In Windows PC ] How To Print Screen In Windows 10 Easily [ Screenshot In Windows PC ]](http://electronicsguide4u.com/wp-content/uploads/2019/10/windows_ss_9.png)
3. Taking Screenshot in Windows without further saving the image
Now here we will eliminate the extra second step of saving the screenshot as we saw above by using an image editor application .
So now the screenshot will get automatically saved in the ‘Screenshots’ folder present inside the ‘Pictures’ folder (by default present) in your ‘My PC’ section . Further, the screenshots will be marked as serial numbers 1 , 2 …etc
![How To Print Screen In Windows 10 Easily [ Screenshot In Windows PC ] How To Print Screen In Windows 10 Easily [ Screenshot In Windows PC ]](http://electronicsguide4u.com/wp-content/uploads/2019/10/windows_ss_8.png)
For this you have to hit the keystrokes combination as ‘ Windows logo button + PrtScr ‘ , then the screenshot of the complete screen will be saved in the ‘Screenshot’ folder as said above .
On hitting the buttons, the screen will become dim for a moment then the screenshot will appear in the designated folder . So here we don’t require to again save the screenshot as we saw in the above two methods. So this is simple and less time-consuming.
![How To Print Screen In Windows 10 Easily [ Screenshot In Windows PC ] How To Print Screen In Windows 10 Easily [ Screenshot In Windows PC ]](http://electronicsguide4u.com/wp-content/uploads/2019/10/windows_ss_3-1024x395.png)
4. Print Screen in Windows for any active Window (Screenshot of a specific Window)
So now we want to take the screenshot of an active window . So for this, we have to hit the keystroke combinations as ‘ Alt + PrtScr ‘ , then it will take the screenshot of a particular window. You just need to click on the title bar of the window from where you want the screenshot .
![How To Print Screen In Windows 10 Easily [ Screenshot In Windows PC ] How To Print Screen In Windows 10 Easily [ Screenshot In Windows PC ]](http://electronicsguide4u.com/wp-content/uploads/2019/10/windows_ss_4-1024x399.png)
Now again the screenshot will be present on the clipboard, so paste it on some image editor app to use/save it further as per the required format and dimension . So here you can take the screenshot of a specific window with much ease.
5. Screenshot using the Game Bar In Windows PC
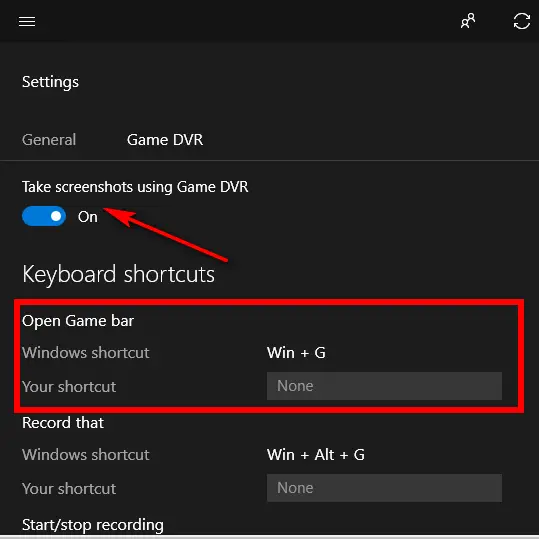
If you are in the mid f playing any intense game or not, you can always take the screenshot by using the button combination as ‘ Windows Key + G ‘ , and then you click on the “Yes, this is a game” option if prompted.

![How To Print Screen In Windows 10 Easily [ Screenshot In Windows PC ] How To Print Screen In Windows 10 Easily [ Screenshot In Windows PC ]](http://electronicsguide4u.com/wp-content/uploads/2019/10/windows_5.png)
Now hit the buttons as “Windows key + Alt + PrtScn” to take a screenshot. Moreover, the keyboard shortcut will work only if you have earlier checked the “Yes, this is a game” box for this specific game. You will see a notification letting you know “Screenshot saved.”
![How To Print Screen In Windows 10 Easily [ Screenshot In Windows PC ] How To Print Screen In Windows 10 Easily [ Screenshot In Windows PC ]](http://electronicsguide4u.com/wp-content/uploads/2019/10/windows_ss_6-1024x404.png)
6. Screenshot Using the Snipping Tool
So this is my personal favorite for taking desired screenshots using the Snipping tool application . It was first introduced in the Windows Vista devices .
On initiating the application you will see a rectangular box containing the options and many other things , then just click on the ‘ New ‘ option at the top , then move your mouse to drag the snipping icon over the area you want to take the screenshot .
![How To Print Screen In Windows 10 Easily [ Screenshot In Windows PC ] How To Print Screen In Windows 10 Easily [ Screenshot In Windows PC ]](http://electronicsguide4u.com/wp-content/uploads/2019/10/windows_ss_7.png)
The Snipping Tool doesn’t by default save your screenshots , you have to manually save them in the tool before you exit and it does automatically copy your captures to the clipboard.
Hope you really like this post regarding the Windows print screen functionality , giving all the simple ways to capture screenshot of your Windows PC with ease. Let me know the other ways (if any) in the comments section. Stay tuned for more exciting stuff in this series .

Aric is a tech enthusiast , who love to write about the tech related products and ‘How To’ blogs . IT Engineer by profession , right now working in the Automation field in a Software product company . The other hobbies includes singing , trekking and writing blogs .


