How To Backup iPhone To iCloud And iPhone Backup Restore From iCloud After Factory Reset ? [ Step By Step Guide !! ]
In this digital arena, being connected socially and using our mobile phones to do pretty much everything (thanks to the ever-increasing number of useful apps) is indeed indispensable. Hence a world without our mobile is next to a nightmare (Isn’t it ?) .
There are certain situations possible like when our iPhone got damaged/stolen (lost) , and we don’t have any backup handy. Unfortunately, we will lose all our important data.
To escape such worst possible scenarios, we are here to guide you to take your iPhone backup to iCloud storage and restore it back to your iPhone instantly.
In this article guide you will learn the following important topics in detail :
- What do we mean by An iPhone Backup ?
- How to take iPhone backup to iCloud ?
- How to factory reset your iPhone (erase all data) ?
- How to restore iPhone backup from iCloud?
- Alternative methods of taking iPhone Backup
So you may skip the sections as you want to (if you are already well acquainted with the background theory) and rather directly concentrate on the practical steps. Having a background knowledge is indeed a wise decision though.
Now without wasting any further time let’s start with our first section . So just relax and enjoy reading .
What exactly is this iPhone Backup ?
We install apps , uses data and store various information in our iPhone all the time . In a layman terms we can say that a backup is a normal file that contains an exact replica of all these data (and settings) stored in our iPhone right now.
So creating a backup simply means that we are creating a file with similar content that is already present in our iPhone device .
The main idea behind creating this backup file is to recover all the exact data related to the installed apps , settings , storage , security etc to your new/old iPhone in case of some emergency/unforeseen situations .
Hence the recovered phone will behave and contain exact data and settings as your old device . Thus you can fetch all the info to this recovered device just the way you like it/used to with .
Now once the exact meaning of iPhone backup is clear (hopefully) , we can now start exploring our next section to see the exact steps for taking iPhone backup to iCloud correctly .
Note : iPhone backup basically contains everything including your settings , app data , contacts , photos, videos etc
How To Backup iPhone To iCloud Storage ? (The Most Common Way Of Taking iPhone Backup !!)
There are in total three ways of taking the iPhone backup . The iCloud backup option is the most common ( and recommended ) way of backing up your iPhone data and settings .
By default we receive a generous 5 GB iCloud storage free with our new iPhone . Sooner or later we realize that we are out of cloud storage space .
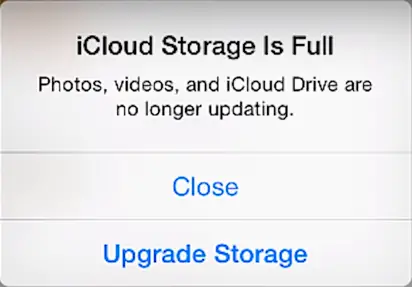
The main culprits here , that precisely consume the maximum amount of the iCloud storage is none other than our photos and videos (:-p).
We have a dedicated article covering the steps to minimize this and to use our initial 5 GB (or your iCloud space) judiciously. Just visit the post and learn the different ways to use iCloud space efficiently.
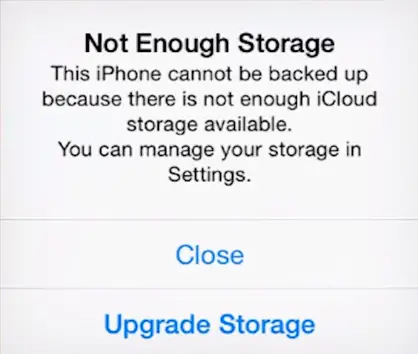
Anyways we are here to learn the steps to take the iPhone backup into iCloud , so that we can use this backup file afterward.
The steps are indeed very easy. Before this, there are some prerequisites. First, you should be connected to an active internet connection and second is that you must already have your iCloud account set up beforehand.
Note : iCloud is a type of Apple’s cloud storage solution, wherein you can store all your iPhone data to cloud . Storing data in Apple’s cloud storage is really secure and the backup file will be mapped to your Apple ID
Steps to Backup Your iPhone To iCloud Account !!
In case you bought a new iPhone or want to transfer data from old iPhone to this new iPhone,then also follow the same steps. To backup iPhone to iCloud, you have to follow the below simple steps :
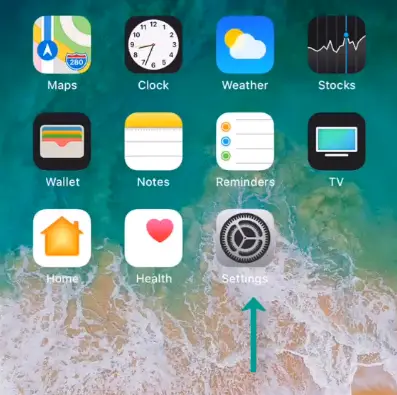
1. Tap on the ‘Settings‘ app (gear icon) in your iPhone
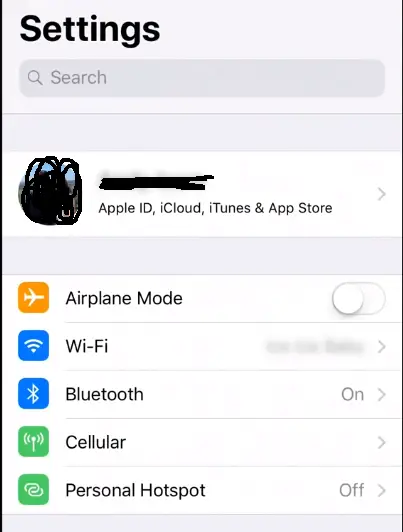
2. Tap on your name (Apple ID) at the very top option
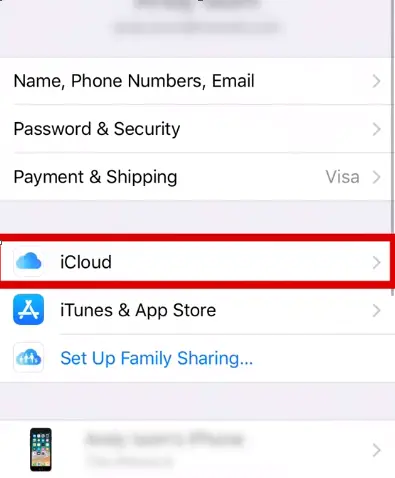
3. Select iCloud and tap on it
4. Now in this screen , you will see various color notations to display your iCloud storage (Manage storage section) 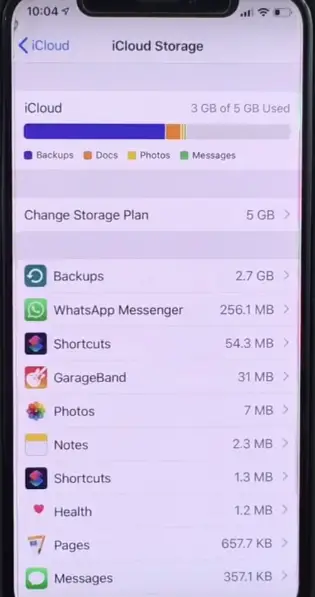
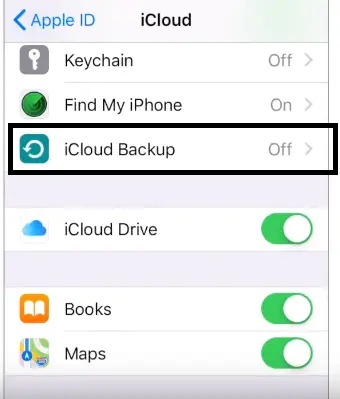
scroll down and tap on the option ‘iCloud Backup‘
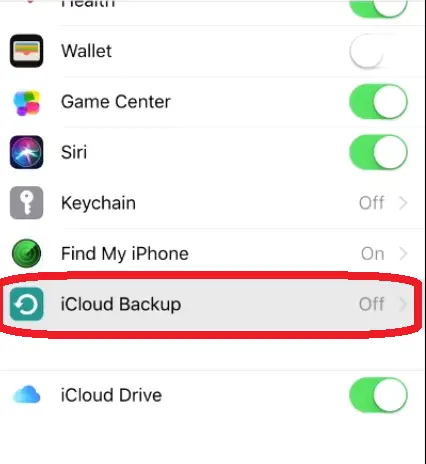
5. In the next screen , you can see a toggle option for turning On and Off your iCloud backup feature .
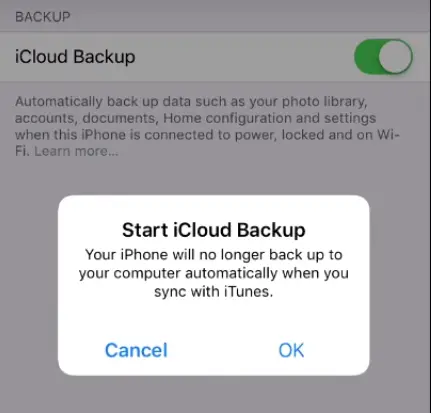
6. Toggle the option to the right to turn the iCloud backup option ‘ON‘ , (the option turns green)
7. Tap ‘Ok‘ in the ‘Start iCloud Backup‘ pop us dialogue box , after this, you will see a blue-colored text ‘Back Up Now‘
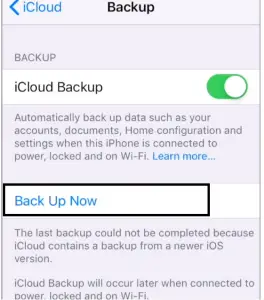
8. Hit the option ‘Back Up Now‘ to manually start the iCloud backup option . Then the process will start and it takes time depending upon your iPhone data and file size . (you can further see the estimated time left)
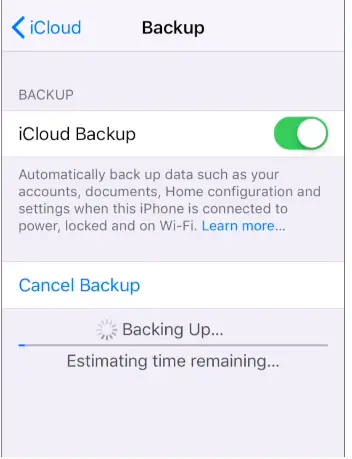
Finally we are done . Now you can use this recently captured backup whenever you want to. Now we shall proceed to our next section i.e. Factory reset your iPhone with steps .
How To Factory Reset Your iPhone (Erase All The iPhone Data) ?
If you just bought a new iPhone , then you no need to factory reset it. As we generally perform the factory reset option to get the factory version of all the settings and default UI that we get just out of the box .
So in your new iPhone , just switch it on, and then you would see a similar setup as we are going to see after factory resetting any old iPhone.
Note: The first and foremost thing here is that you should have already taken a backup to iCloud account for your iPhone . Before following the below steps make sure that you are ready with your iCloud backup in advance.
Follow the below steps to factory reset your iPhone :
1. Tap on the ‘Settings‘ icon in your iPhone

2. Scroll down and tap on the option ‘General‘
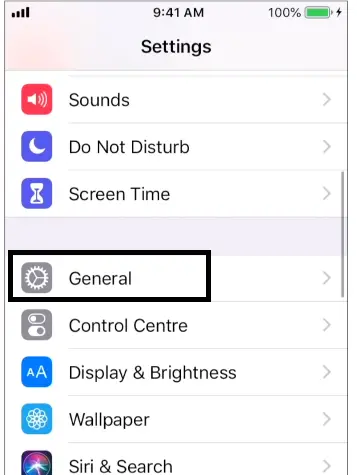
3. Scroll down and at the bottom , tap on the option ‘Reset‘
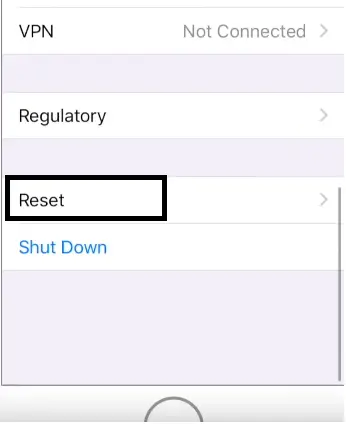
4. Then in the next screen , tap the option ‘Erase all Content and Settings’
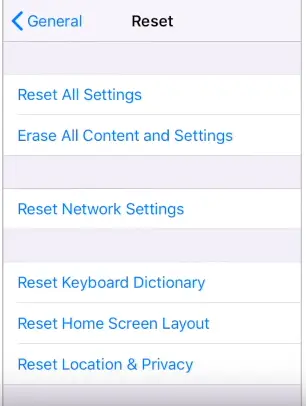
5. Now tap on the option ‘Erase Now‘
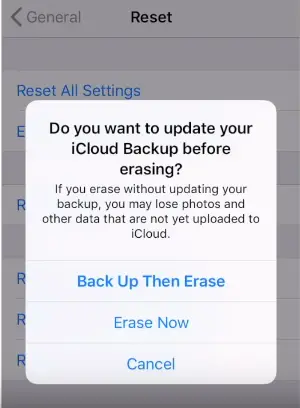
Note : Please note that you already have an iCloud backup handy before executing this step. If you lost any data don’t blame us afterwards as we have already told you to have a backup file in place prior to this step
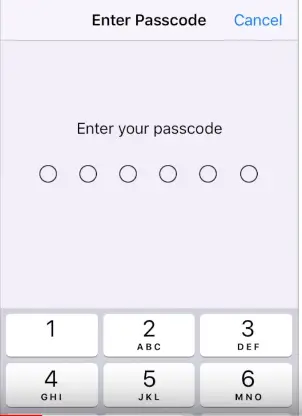
6. Put your iPhone passcode (6 digit)
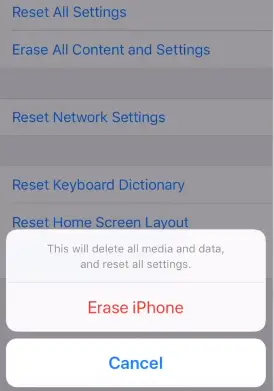
7. Then Hit on the option ‘Erase iPhone‘
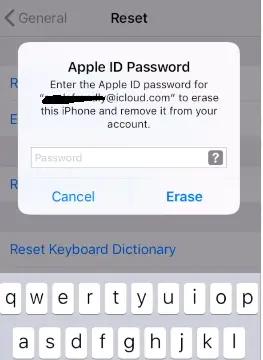
8. Now enter Apple ID password and finally tap on ‘Erase‘
9. Now your iPhone will get Reboot

Now once your iPhone gets a reboot , you need to start as a new user again i.e. going through the initial starting up process seen in the next section . See you in the nest section with the steps to restore your iCloud backup.
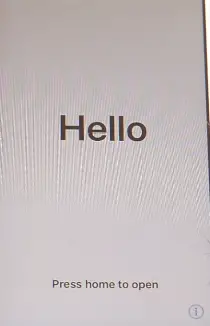
Note : Please remain connected to an active internet connection until the whole process gets over . For iPhone X and above , you need to swipe up to start the process .
Once the restoration is done you can see all your data in the apps , and the settings remain as it is as you backed up previously . No data will be lost and it will be restored seamlessly in this new iPhone from the iCloud backup .
How To Restore iPhone Backup From iCloud ?
Now there can be two possible scenarios here first, you are a new user of this iPhone and second, you are an old user of the Apple OS platform , you just changed your iPhone and now want to restore everything from your iCloud backup .
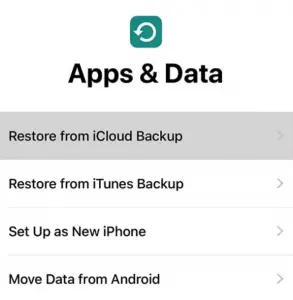
So if you are included in the first case scenario, then you need to generate your Apple ID , account name etc. Just go through the normal prompts in the starting up phase, then you finally reach the screen below to choose the app and data for your new iPhone
So since you don’t have any backup (let assume) , just tap on the option ‘Set Up as New iPhone‘ and then proceed normally to complete the rest setup process.
Now if you are included in the second category as discussed , i.e. already having an old iCloud backup available (from your old iPhone or any other Apple device like Mac etc) .
So turn on your brand new iPhone, first reboot will occur and then you will be asked various checkpoints required to set up your iPhone account.
Follow the steps as given below to quickly restore the saved iCloud backup into your iPhone :
Note : Just make sure that you are connected to an active data connection for the complete process of initial starting up
1. Once you factory reset your iPhone or just starting with your new iPhone, the process remains the same . You can see a screen asking to set up the phone manually
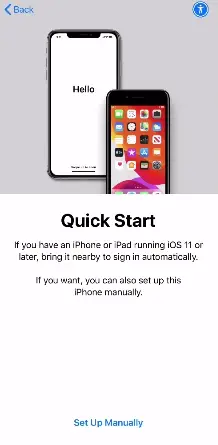
2. You need to go through the normal process (going through various prompts) of starting up your iPhone (set language, passcode, wifi connection, country, set touch/face ID etc)
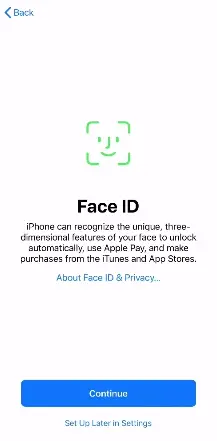
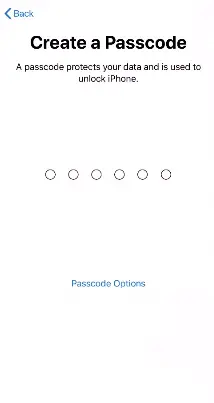
Then you have to set passcode as shown below (there will be many prompts for you to complete each initiation process and to proceed further)
3. Finally you can see the screen you have been waiting for, to set up your Apps and Data (Apps and data screen) . There will be various options present , but we need to select the option ‘Restore From iCloud Backup‘
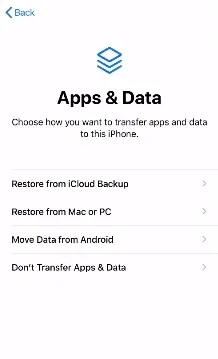
Note : In the above screen you have to choose how you want to transfer your old Apple device data (provided you have any)
4. Enter your Apple ID (the one you have already used earlier) , then hit next
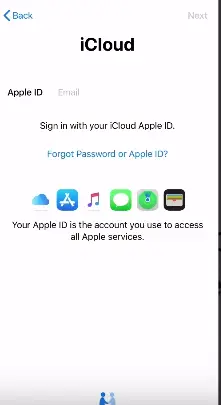
Note : Once you enter the email address and password , it will then verify your identity by sending a code to some other Apple device like a Macbook , Apple watch or old iPhone etc .
Once you logged in with your Apple ID , then it may ask you the password of your other Apple device .
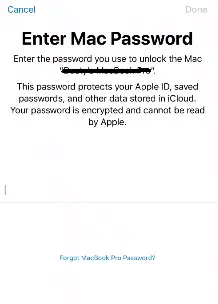
5. Now you can see a screen showing all the recent backups available to be restored in this iPhone (mapped to your Apple ID) ,you can further view all the list of backups along with the device and the OS version alongside .
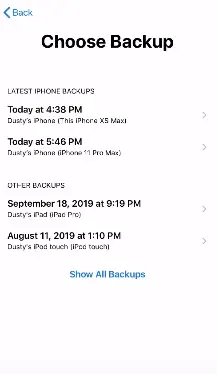
6. Select the most recent version of backup and tap on it (then hit continue for the next few screens)
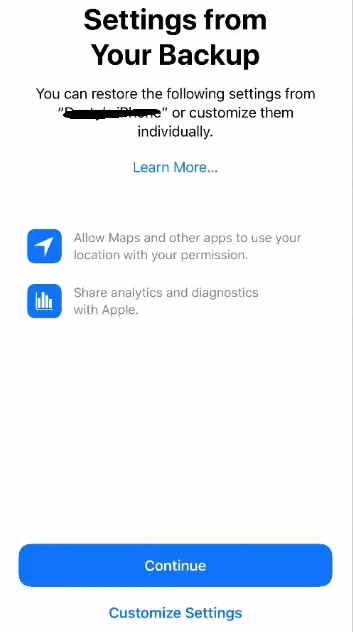
7. Finally, the restoration process will start (it may take a few minutes) , then again it will reboot your iPhone
8. Input your passcode , it will take some time to download the apps from app store (app data is already there in the iCloud storage space)
Once everything done , you can finally able to turn on your iPhone device and then see the app icons downloading in the app tray of your iPhone . The app data is already present in the iCloud storage , only the apps are installing from the Apple app store.
After some time you can access all your iPhone data as you were using in your old iPhone/old Apple device .
In the next section we will explore the other alternative options present to take the backup of your iPhone to iCloud . So lets proceed further .
Is there Any Alternative Option Present To Take Your iPhone Data Backup ?
As we have already seen above, it is pretty much simple to take a well-suited backup for your iPhone using the iCloud option . However, there are two other ways by which you can easily take the iPhone backup . iCloud backup is all about Apple’s cloud storage space .
The two other methods to take your iPhone backup is by means of iTunes backup and by backing up your app’s data .
With the iTunes backup option, you can backup iPhone to some desktop computer (Windows/Linux/Macbook) via a wired cable called USB .
The third option is not really a backup option though (still it is my personal favorite ;-p) . It is called as the iCloud App backup .
In simple terms here, instead of saving all your iPhone data and send it to iCloud (which eventually consume a lot of cloud storage space and takes time to download/upload things) .
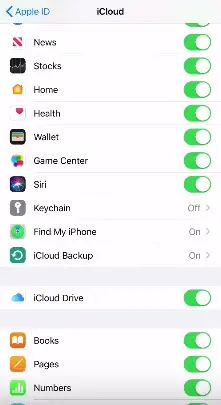
Here you can just recover the information of your app’s storage to the cloud . once you install the app , all the data will then be made available from the iCloud storage account linked to your Apple id.
The cons here is , you will not get any wallpapers, iPhone settings, or any other device-related files/settings etc . You will get only the app data that is already stored in the iCloud .
So you can get only app-specific data in this option and not the complete iPhone settings and wallpapers .
The pros here is that this is really very faster and it recovers the data instead of downloading everything from the phone to look the way it is.
For this iCloud App data backup option , you need to make sure that all the toggle options are turned on for all the important apps (the apps that you want to access in the new iPhone device as shown in the screenshot above)
If you are still using the free 5 GB iCloud storage that comes bundled along with your new iPhone , then you may face insufficient storage issues . Its always better to buy the higher premium plans i.e. 50 GB or 200 GB depending on your usage (you need to pay for this obviously) .
These are our monthly prices by storage size in the United States (USD).
- 5GB: free
- 50GB: $0.99
- 200GB: $2.99
- 2TB: $9.99
Learn more about our iCloud storage pricing in other countries and regions.
The last option you may consider (if you are willing to move out from the Apple-specific products) are the other cloud storage platforms . Saving everything in the cloud is much secure and flexible. You can access the data from anywhere seamlessly .
So you can anyways opt for the popular cloud storage solutions like Google Drive , Microsoft Azure Services , Dropbox , Onedrive etc to make your life easy and tension free indeed.
iPhone Backup To iCloud – Final Wrap Up !!
As already evident from the above , it is really very straightforward to take the iPhone backup to iCloud and again restore the backup to your iPhone device .
Just make sure that before you opt for the restoration of any backup , you should already have a recent/old backup in place in your iCloud . In the next post, we will explore the steps required to take iPhone backup using iTunes .

iCloud backup essentially takes storage space in the Apples cloud servers (doesn’t require any wired link and it is automatic) whereas iTunes backup takes space in your computer’s local storage (and it requires a wired link between your iPhone and PC).
I hope you really liked this post . Stay tuned for more interesting stuff in this series .

Aric is a tech enthusiast , who love to write about the tech related products and ‘How To’ blogs . IT Engineer by profession , right now working in the Automation field in a Software product company . The other hobbies includes singing , trekking and writing blogs .

